The Seating Plan Builder lets you draw your classroom and put each student in a seat. Use it to plan a new term's seating for 8W, to try a group-work layout for one lesson, or to print a plan for a cover teacher. You can seat a whole class in one go, move students by hand, and lock the seats you do not want changed.
Where your data goes
Everything stays on this device. Your plans, room layouts and student names are saved in this browser and are never sent anywhere. That also means they are not on your other devices, and clearing the browser's data deletes them. To keep a copy, or to move your plans to another computer, use Backup & Restore in the sidebar.
Quick start
- Make sure your class is in the Student List. See "Get a class into the Student List" below.
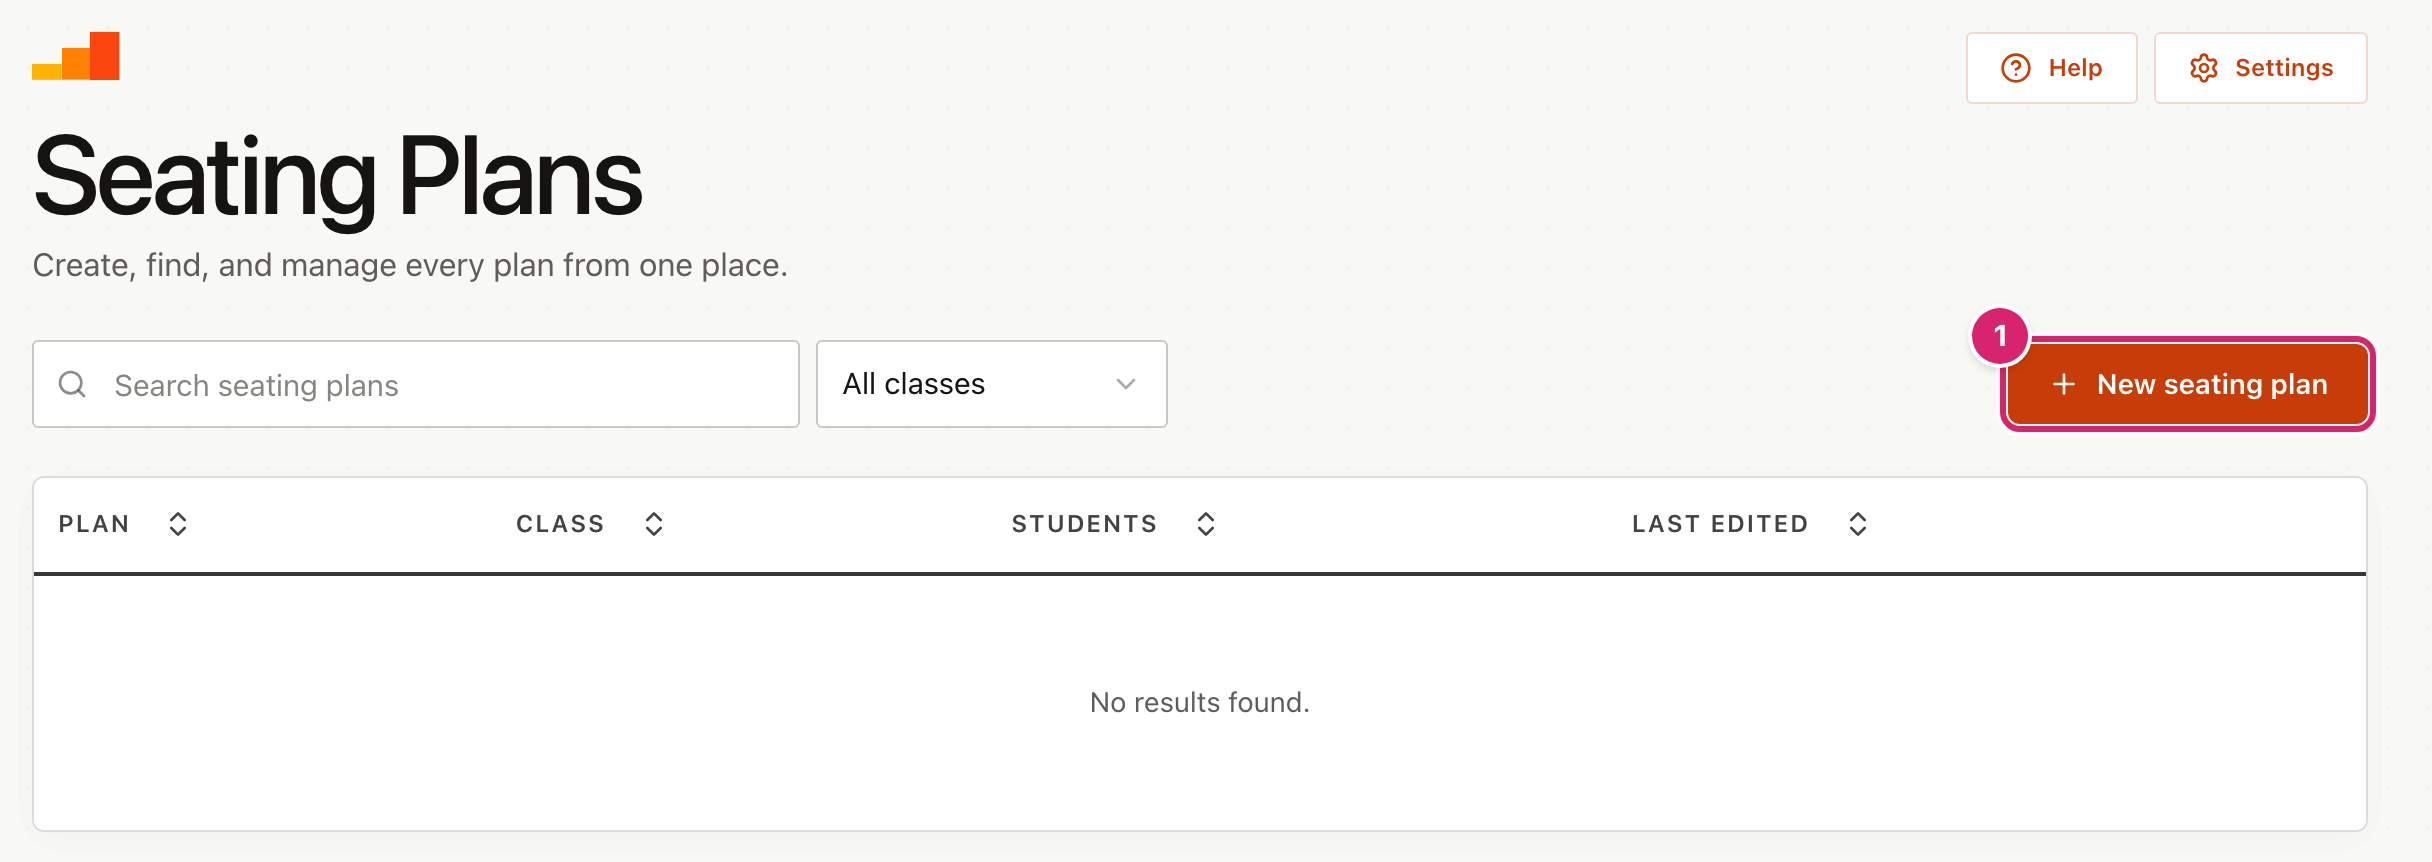
- Select New seating plan 1.
- Choose the class, name the plan and select Create plan.
- In the editor, select Arrange to seat everyone.
- Select Save changes to keep the plan.
Get a class into the Student List
The builder uses the names, classes and photos in your Student List. Until a class is there, New seating plan is switched off, and the page asks you to add a class first.
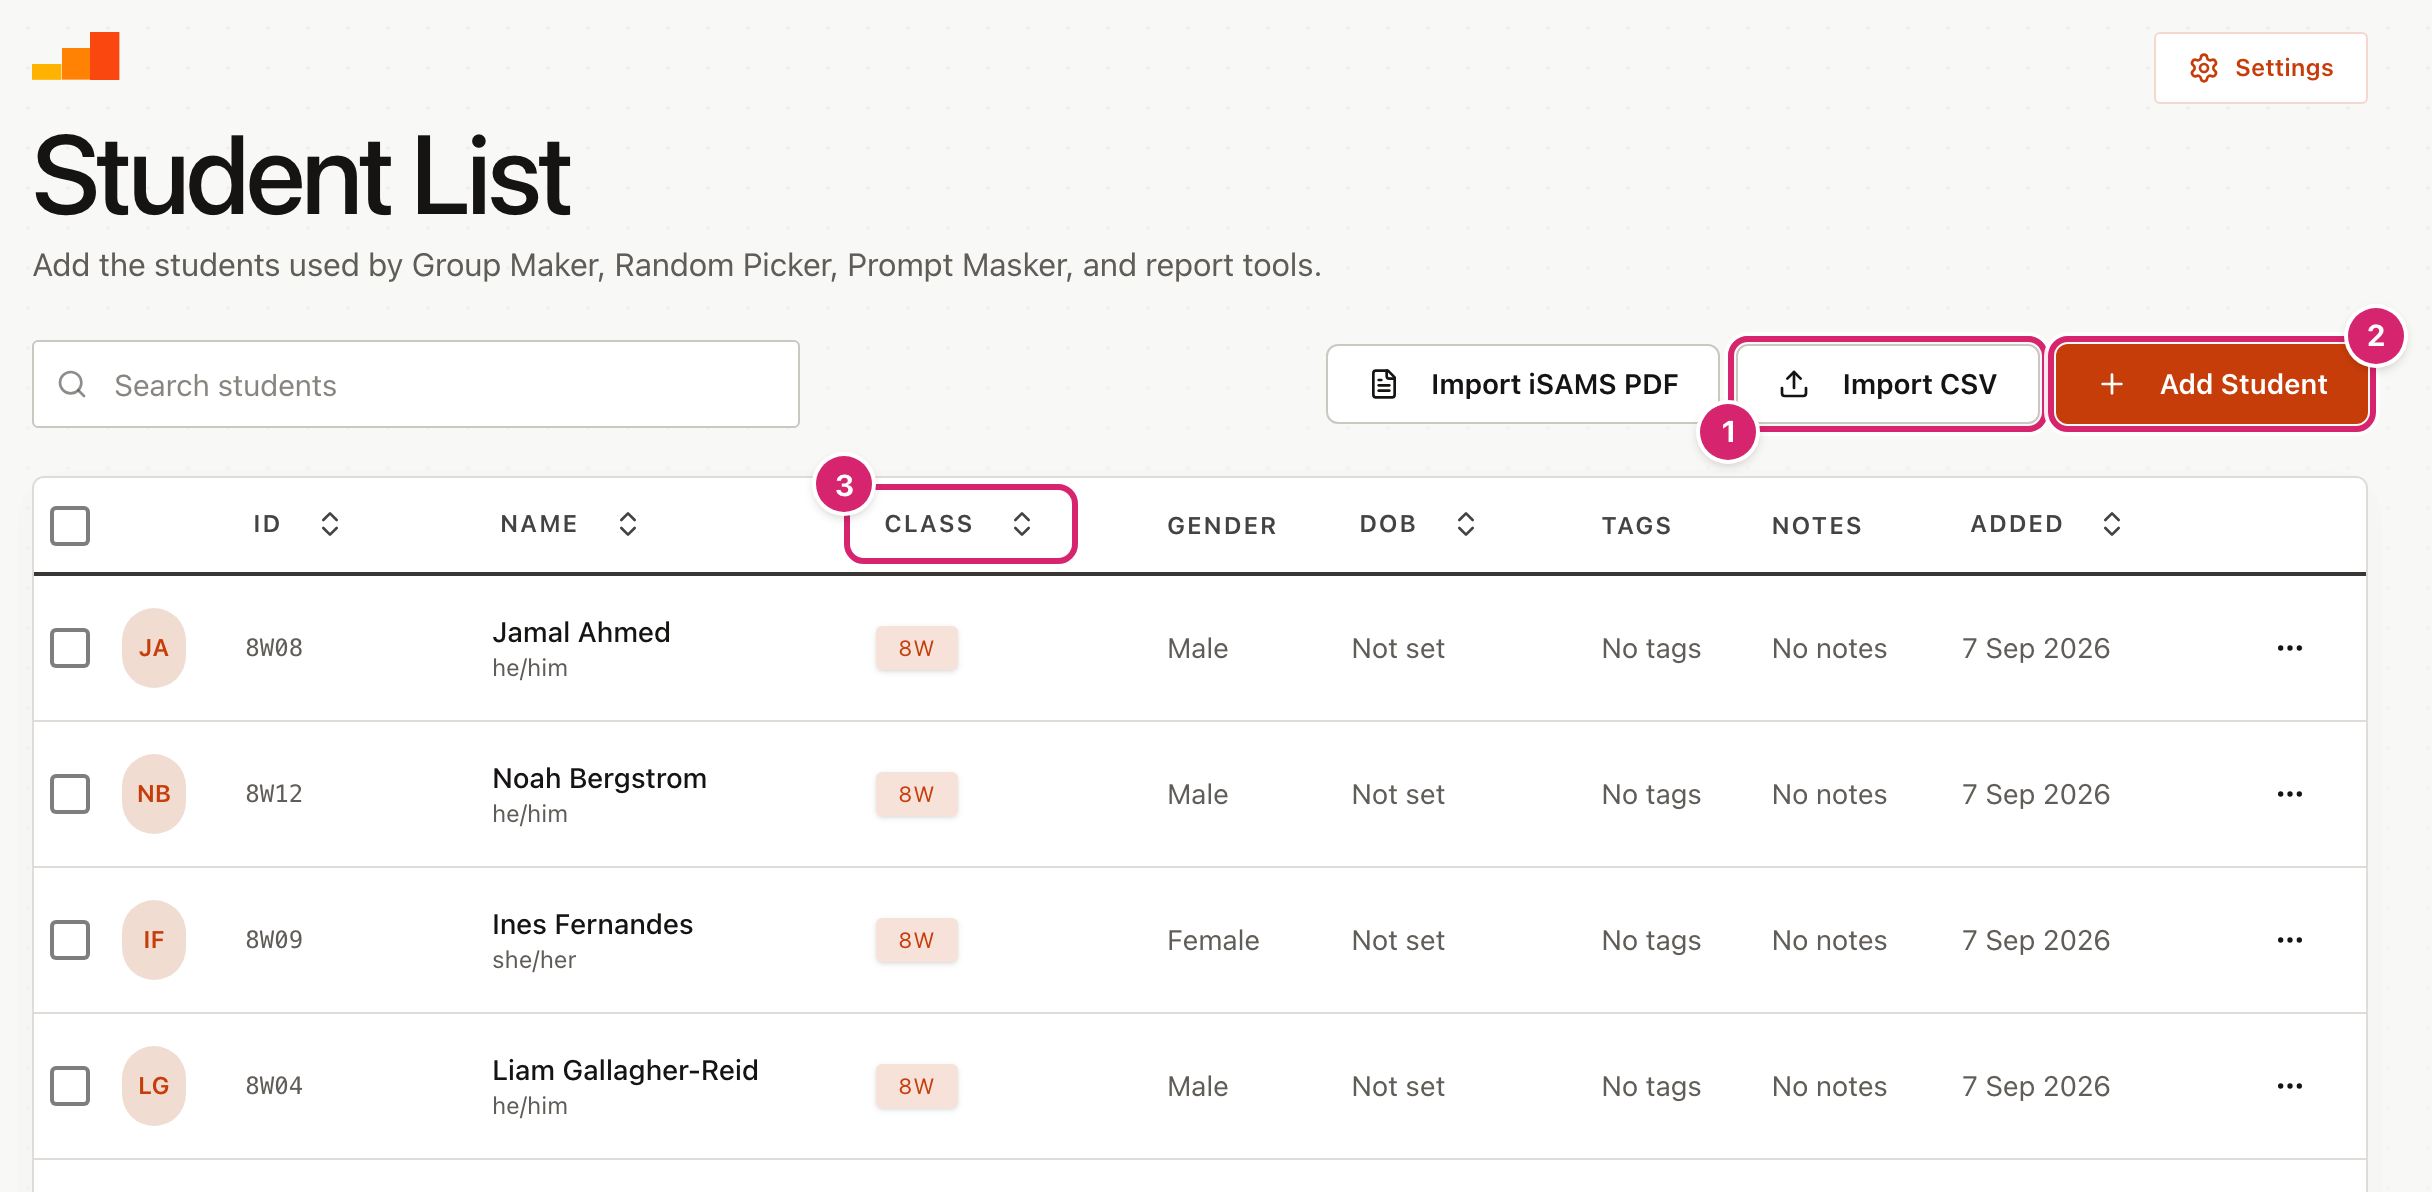
- Select Student List in the sidebar.
- To add a whole class, select Import CSV 1. A CSV is a spreadsheet saved as plain text. The import window has a Download Template button that gives you a file with the right columns.
- Each student needs a first name, a last name and a class, such as
8W. A student ID, gender, pronouns and date of birth are optional. - To add one student, select Add Student 2. You can add a photo here too.
- If your school uses iSAMS, select Import iSAMS PDF instead. It reads a Set List PDF on this device and brings in names, classes and photos.
The Class column 3 is what matters. Every student with the same class name is in the same class. The names are compared exactly, so 8W and 8w count as two different classes. Keep the spelling consistent.
Make a plan
When you select New seating plan, a window asks three things.
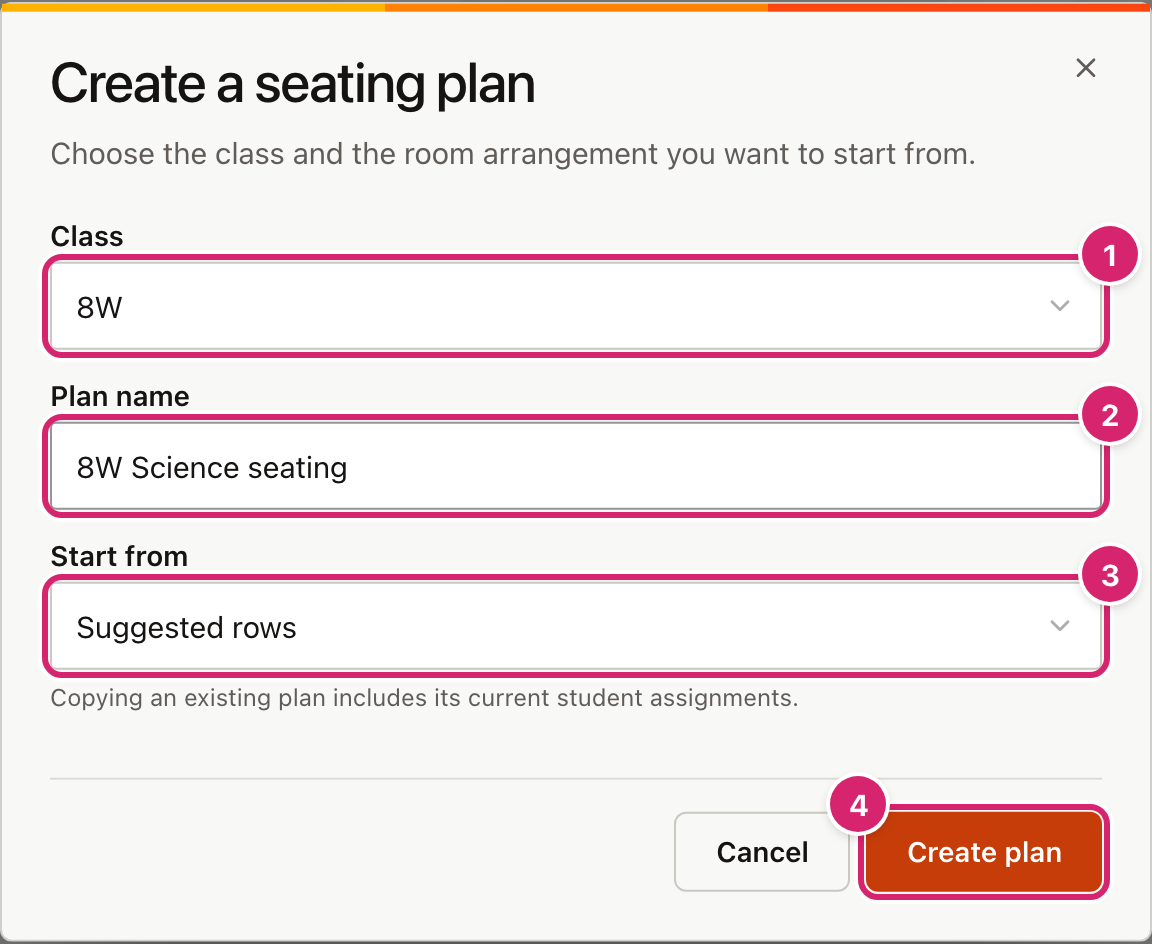
- Class 1 lists every class in your Student List.
- Plan name 2 fills in as "8W seating plan" when you choose a class, if you have not typed a name yet. Change it to something you will recognise, such as "8W Science seating".
- Start from 3 sets the room you begin with. Suggested rows makes one desk for each student. Blank room starts empty. A Room layout is a room you saved earlier. An Existing plan copies that plan with its students already seated.
- Select Create plan 4.
Create plan stays switched off until you have chosen a class and typed a name. Two plans for the same class cannot have the same name.
Seat students for you
Select Arrange 1 and the builder shuffles the whole class into the free seats.
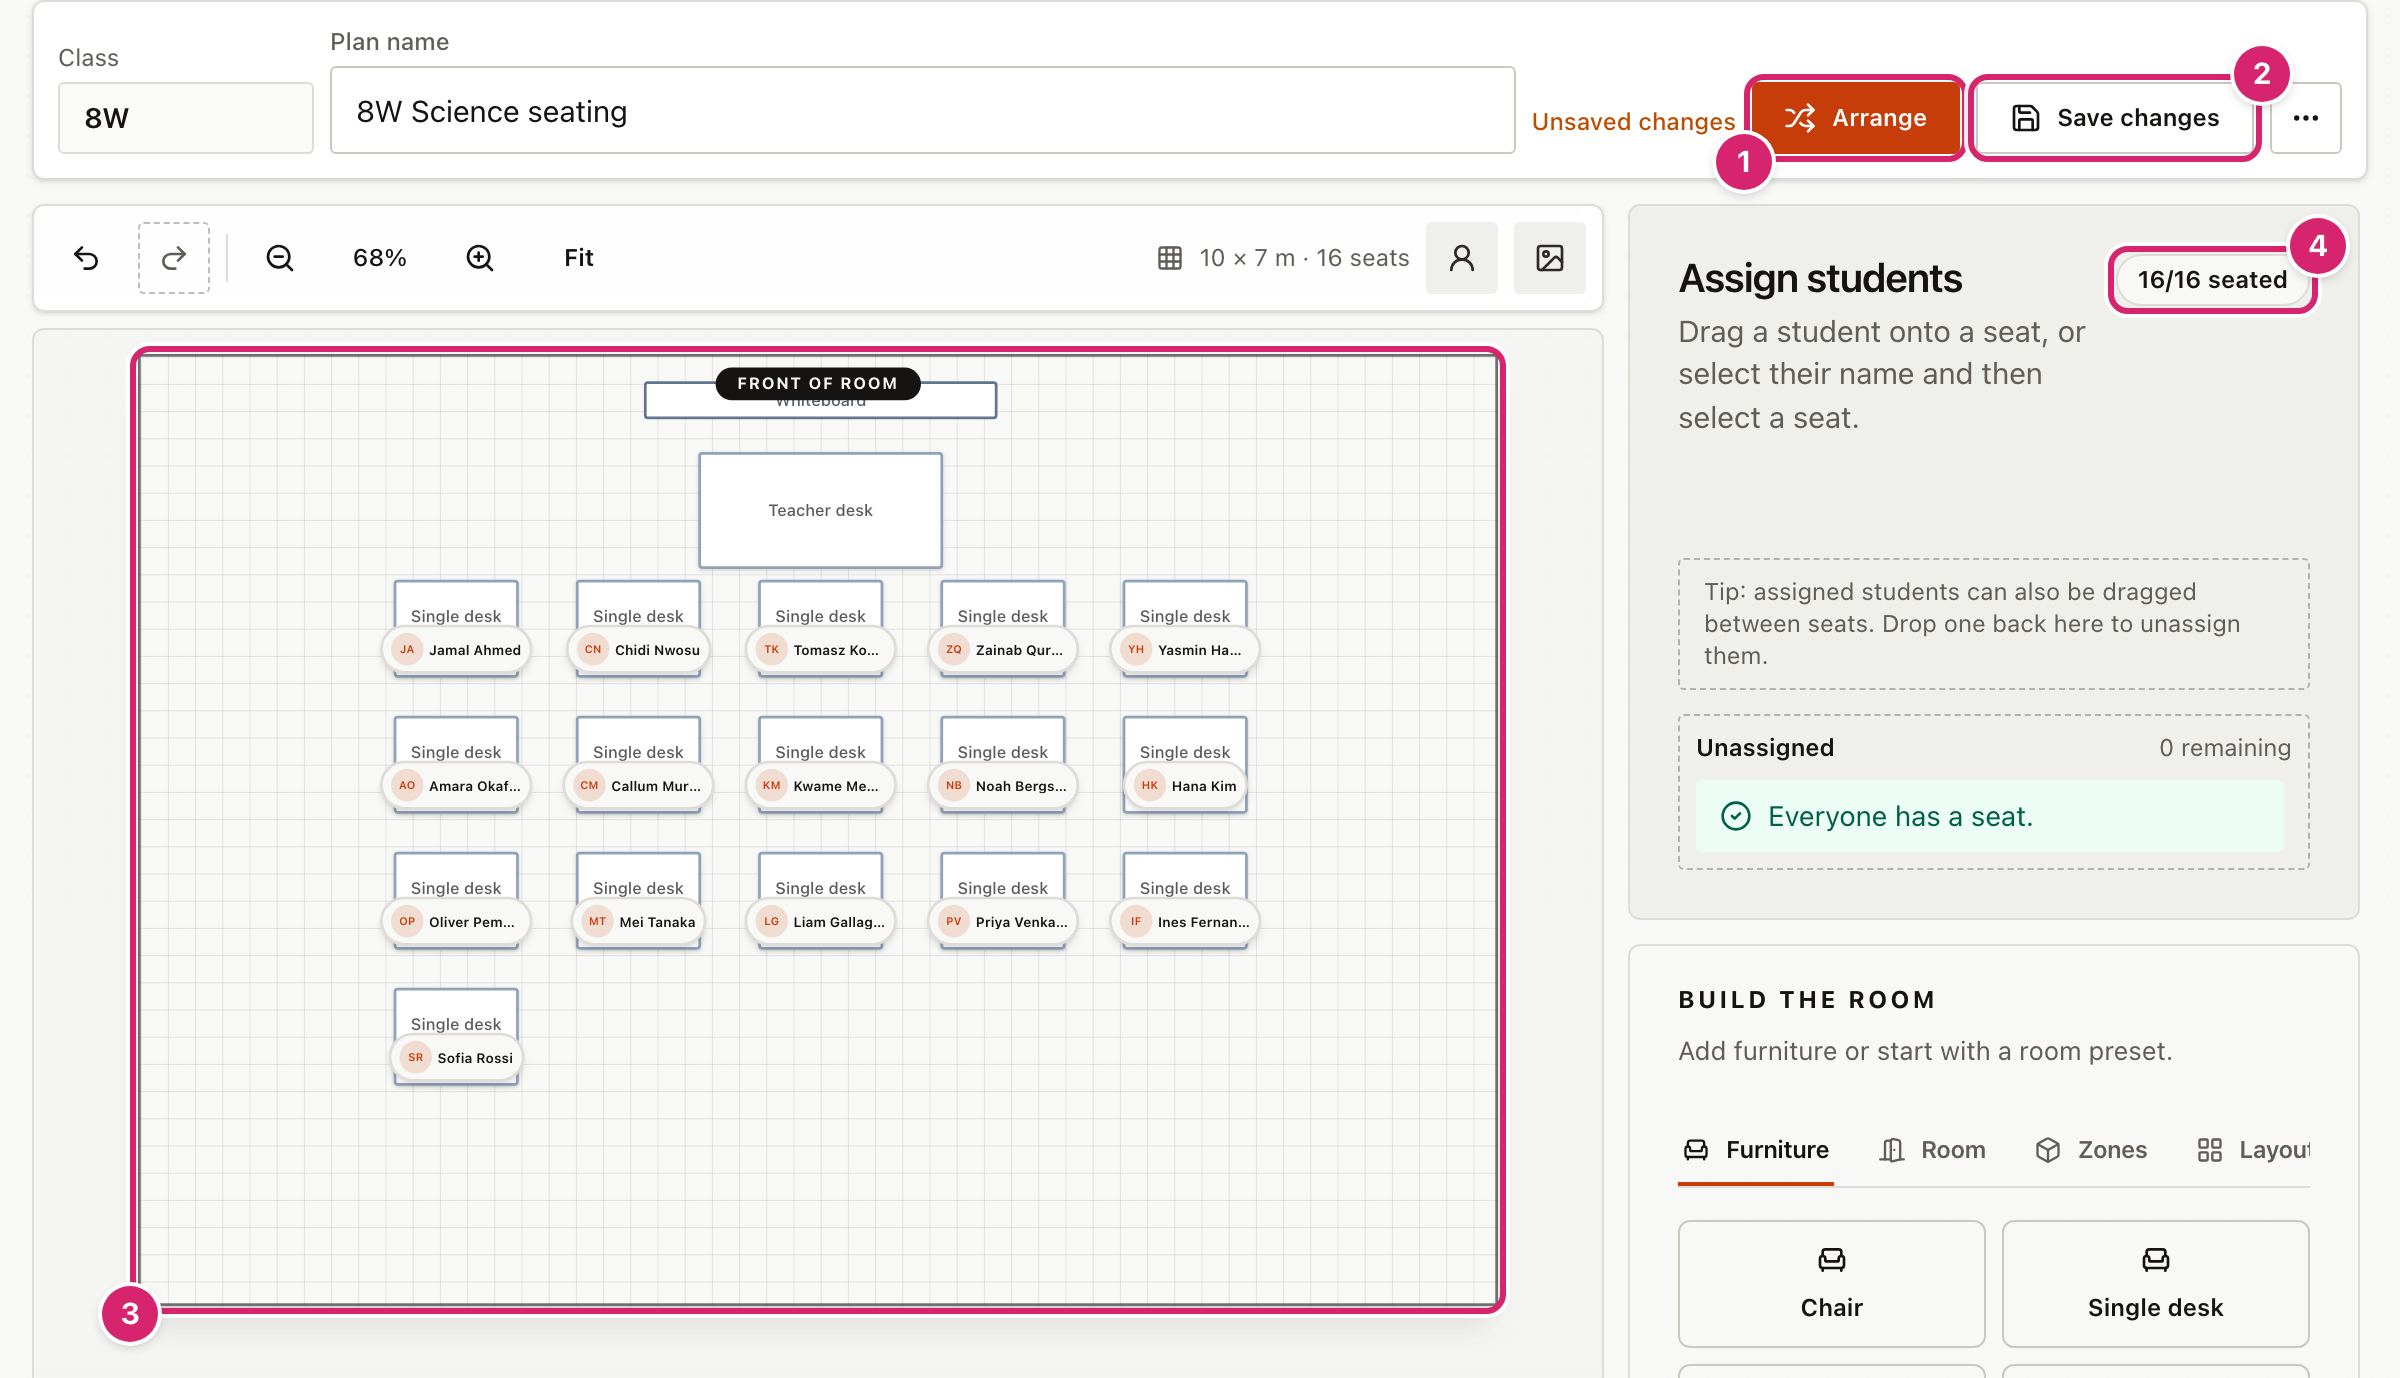
- The count 4 shows how many students have a seat. The Unassigned list below it shows who is left.
- If you have made rules in Group Maker, Arrange follows them. Students marked Keep apart are not put next to each other, and students marked Keep together are. It tries many shuffles and keeps the best one. It cannot always meet every rule.
- Select Arrange again for a different seating. Each press replaces the seating, except in locked seats (see below).
- Unsaved changes appears next to the plan name until you select Save changes 2.
- The room 3 is the drawing of your classroom. The toolbar above it has Undo, Redo, zoom buttons and Fit.
If the class has more students than seats, a yellow message under the room tells you how many need an extra seat.
Seat students by hand
You can place or move one student at a time.
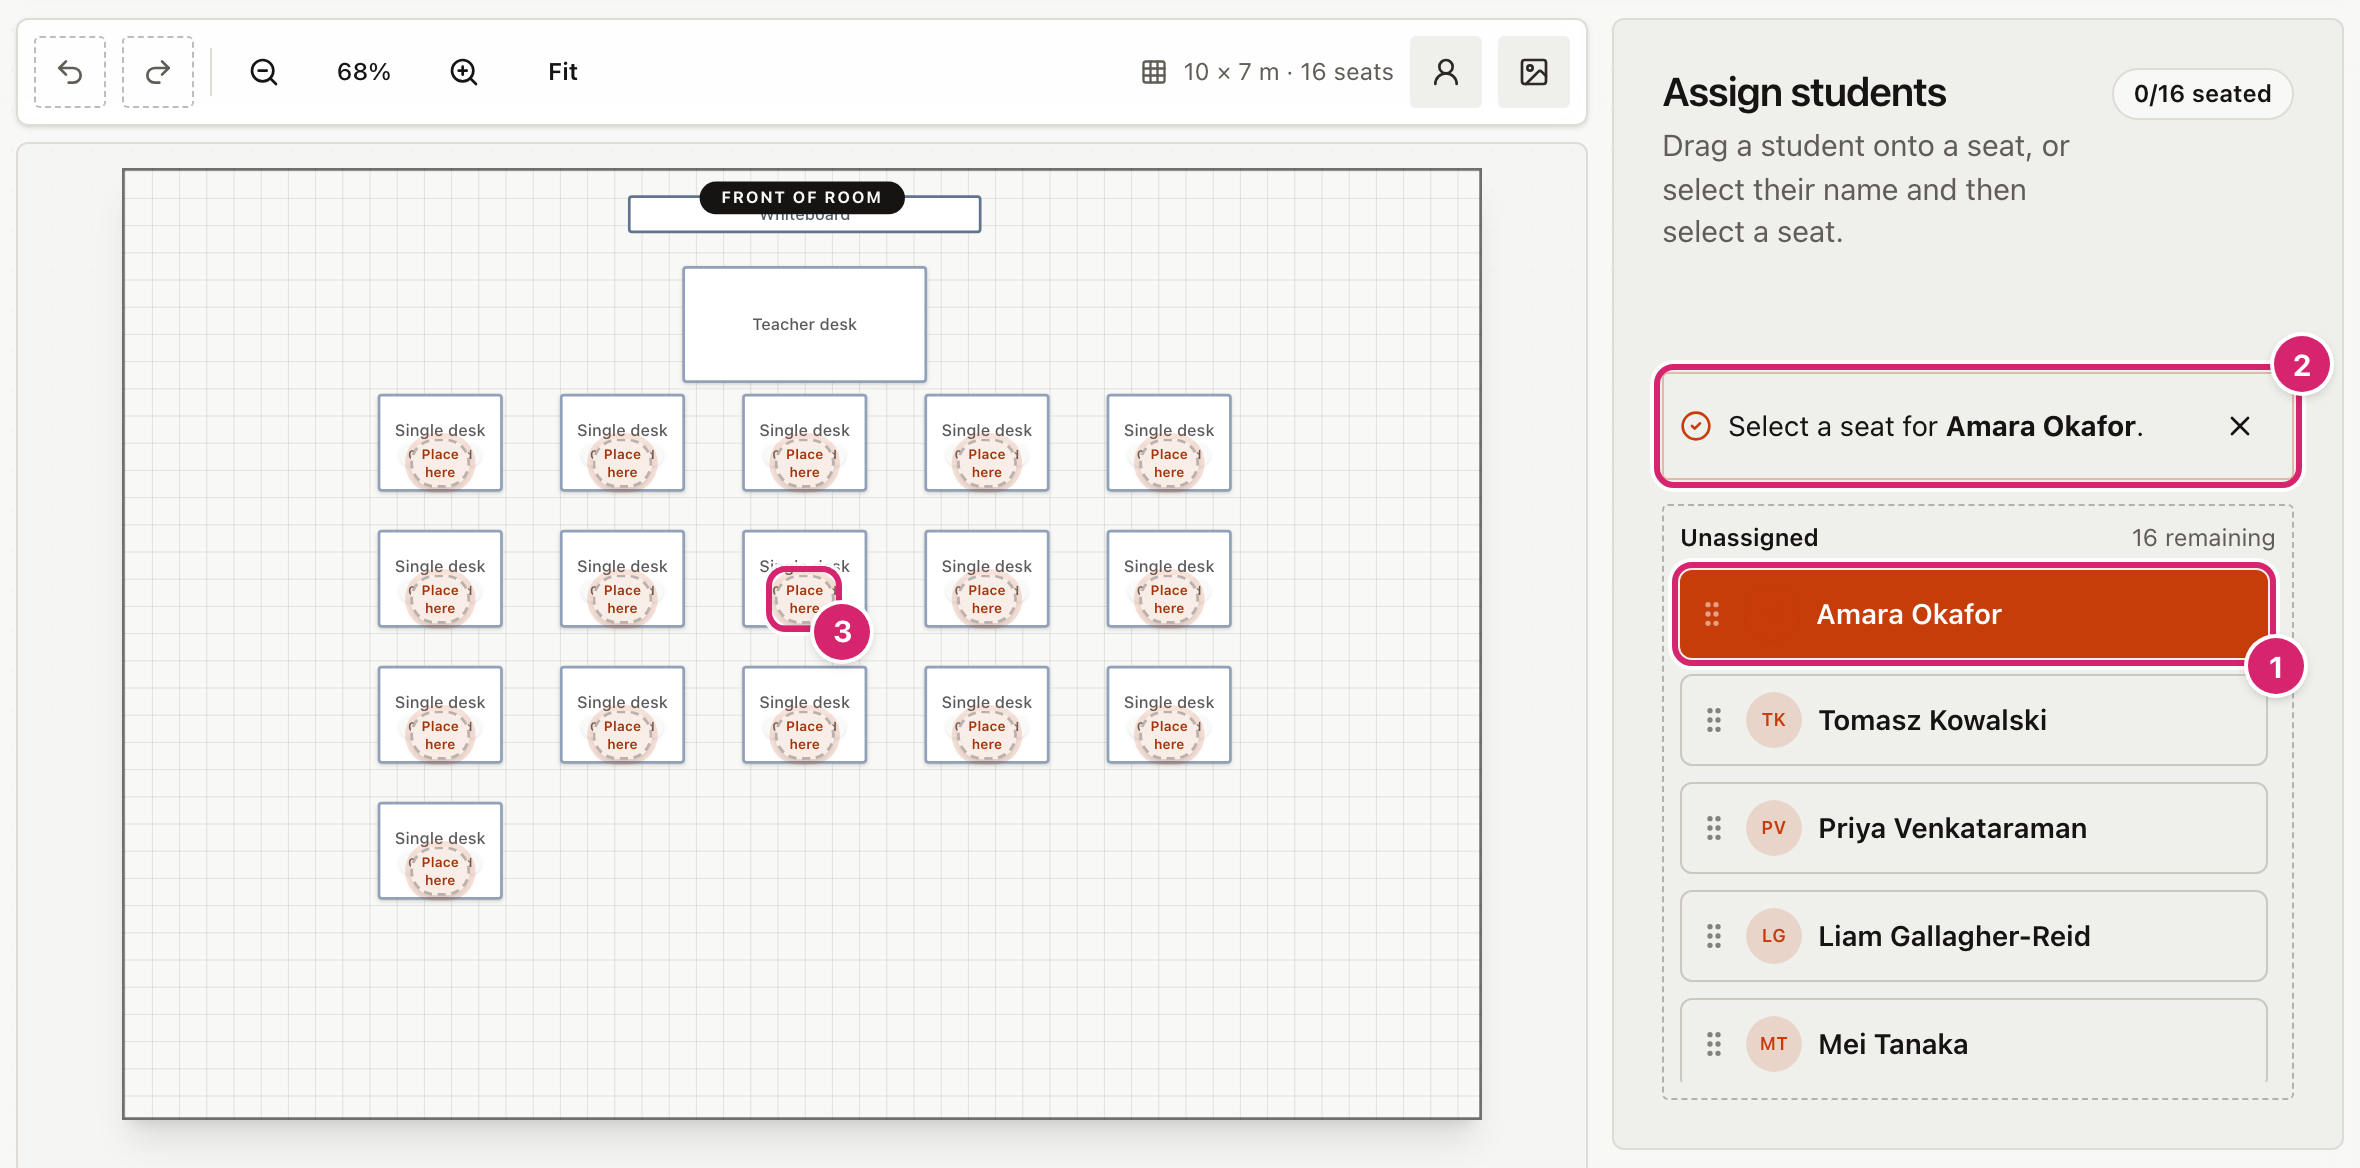
- In the Assign students panel, select a student's name 1. A message 2 says who is selected, and every free seat changes to Place here.
- Select a seat 3. The student sits there.
- To use dragging instead, drag a name from the list onto a seat. You can also drag a seated student to another seat. If the other seat is taken, the two students swap.
- To take someone out of a seat, select their seat, then select Unassign. Or drag them back onto the Assign students panel.
Names on the seats are shortened to fit. Hover over a seat to see the full name. The two buttons at the right of the toolbar hide the names or the photos.
Change the room
The Build the room panel adds furniture and changes the whole layout.
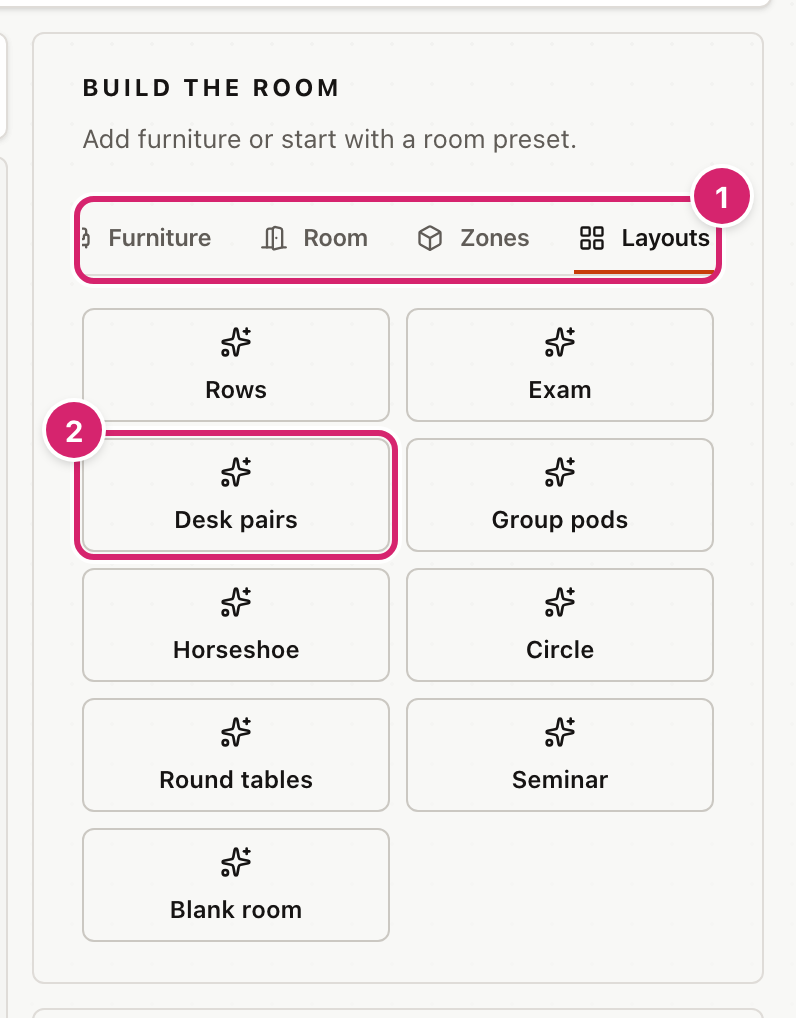
- The tabs 1 are Furniture, Room, Zones and Layouts. Select an item to add it to the room, then drag it where you want it. Furniture has desks, tables, chairs and sofas. Room has whiteboards, doors, windows and a sink. Zones marks areas such as Keep clear.
- A button on Layouts 2 replaces the whole room with a ready-made one, sized for your class. This removes everyone from their seats. If you did not mean it, select Undo straight away.
- To move something, drag it. To select several things, hold Shift and select each one. Press Delete or Backspace to remove the selected things, Ctrl+Z (⌘Z on a Mac) to undo, and Ctrl+D (⌘D) to duplicate.
- Select a desk and a Selected object panel appears at the bottom of the right-hand column. It sets the desk's label, position, size and angle, and how many students sit at it.
- Room settings sets the room's width and depth in metres, which side is the front, and whether the grid shows and desks snap to it. The drawing of the room changes shape to match the width and depth, and the zoom adjusts so you can see all of it. Type a size, then select outside the box or press Enter to apply it. If you make the room smaller, the furniture moves closer together so that it stays inside. Select Undo if you want the old size back.
When you have a room you like, type a name under Reusable classroom and select Save layout. It saves the room without any students. Next time, choose it in Start from when you make a plan.
Keep some students in place
Lock a seat when a student must stay where they are, for example next to a teaching assistant. Arrange moves everyone except locked students.
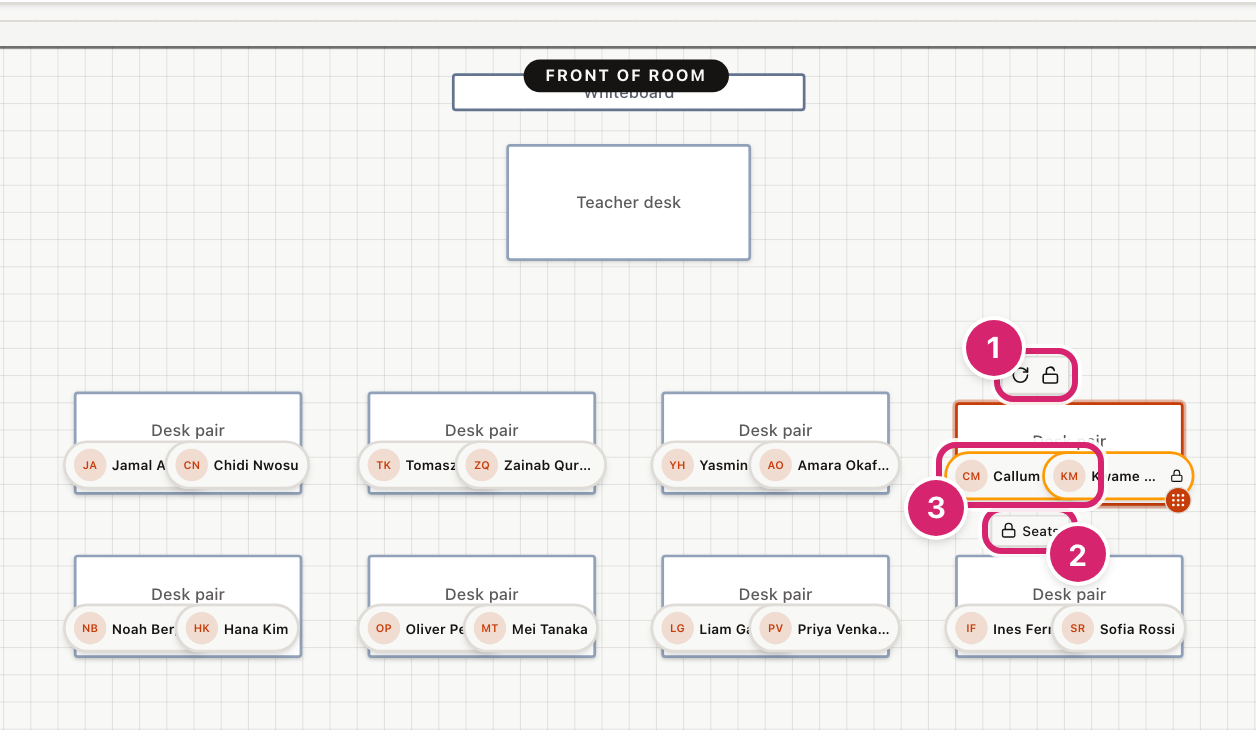
- Select a desk. A small bar 1 appears above it with buttons to rotate the desk and to lock the desk.
- Select Seats 2 to lock the seats at that desk. Locked seats 3 get an amber outline and a padlock.
- Select Arrange. The locked students stay, and everyone else is shuffled into the other seats.
Select Seats again to unlock them. A locked seat cannot be changed by hand either. If you drop a student on a locked seat, or try to move a student out of one, a message says the seat is locked and nothing moves. Unlock the seat first.
The padlock in the small bar locks the whole desk. A locked desk cannot be moved, and Arrange leaves its students alone.
Save, print and find your plans
Select Save changes to save the plan. If you leave the editor with unsaved changes, your browser asks you to confirm first.
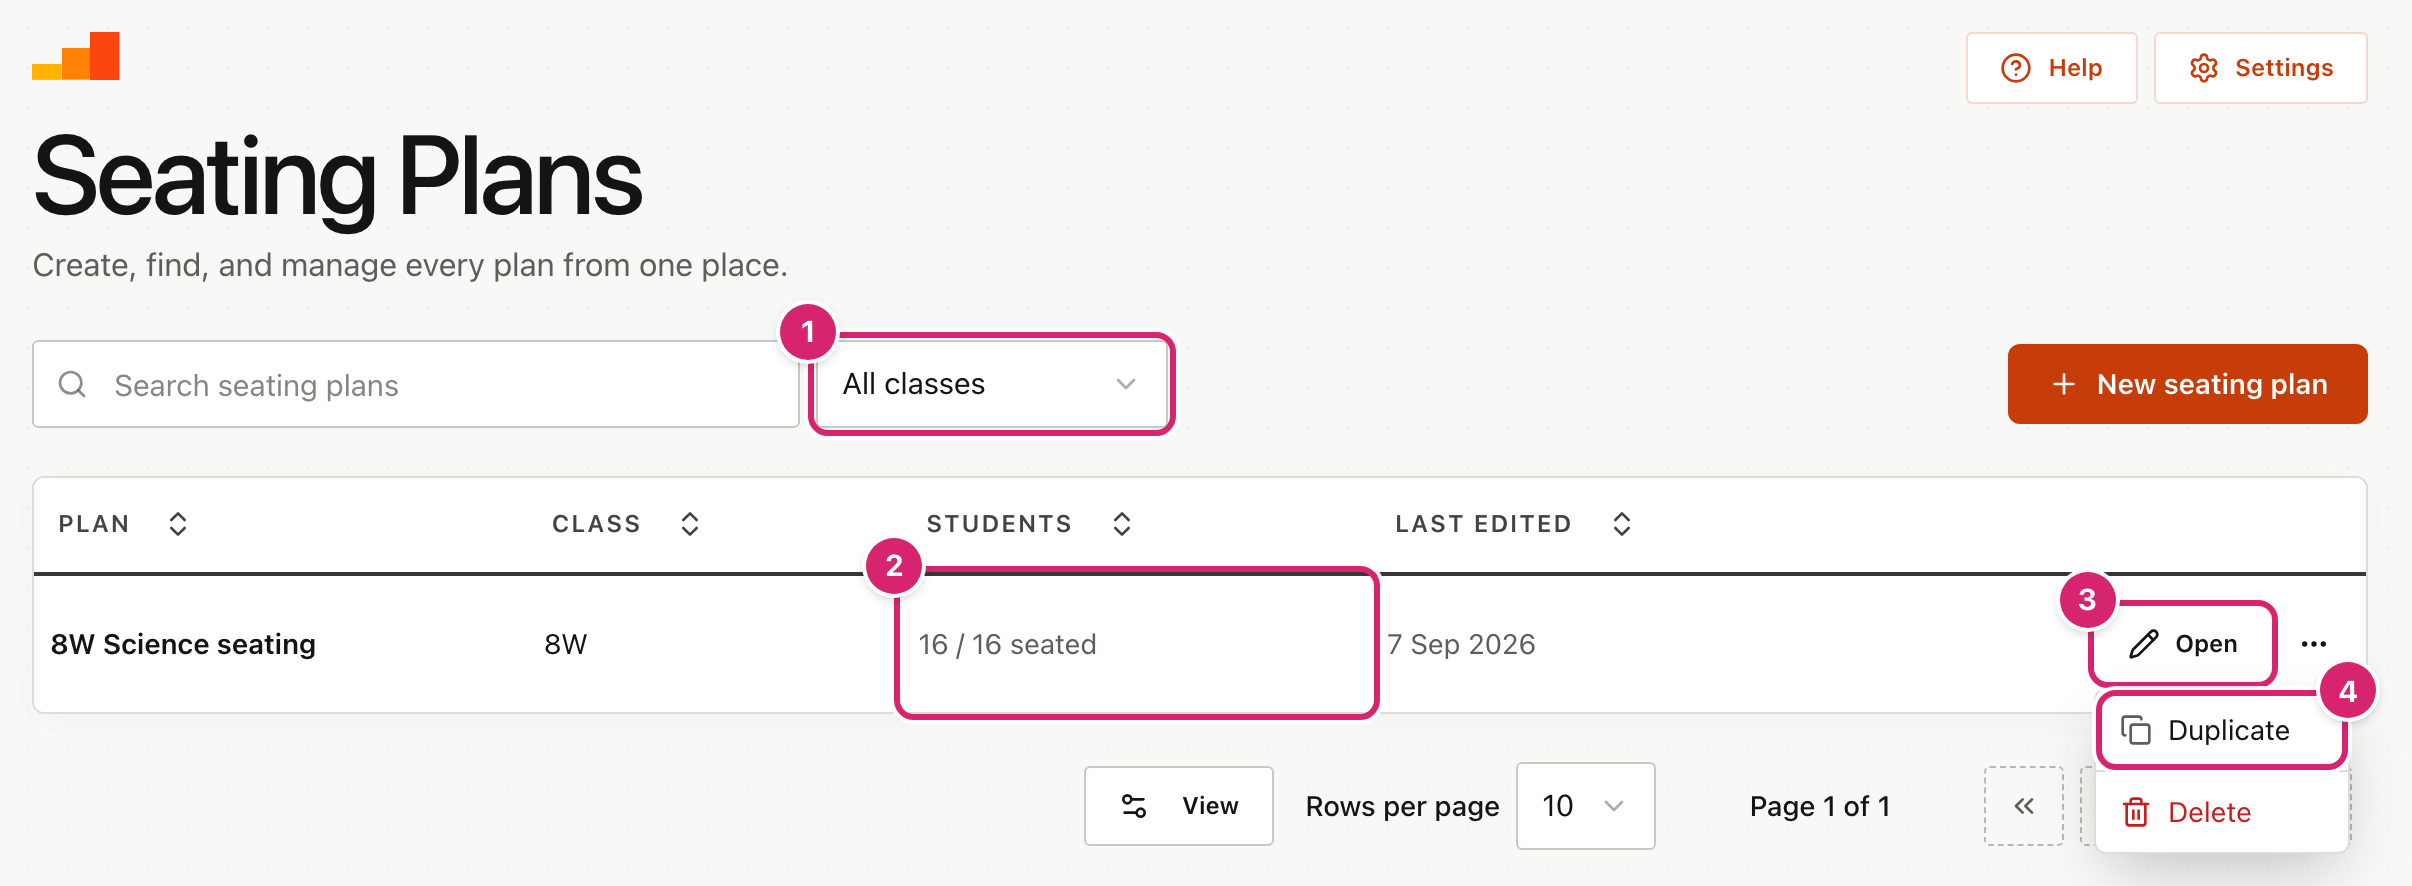
- The class filter 1 shows the plans for one class. The search box finds a plan by name.
- The Students column 2 shows how many students are seated.
- Select Open 3, or the plan's name, to edit it.
- Duplicate 4 makes a copy called "8W Science seating copy" and opens it. This is the way to try a different arrangement without losing the first. The editor has the same option in the ⋯ menu next to Save changes.
- Delete asks you to confirm. A deleted plan can only be recovered from a backup.
To print a plan, select the ⋯ button in the editor, then Print plan. Your browser's print window opens. The printout shows the plan name, the class, the room size and the room, without the controls.
Tips
- Start with Suggested rows, then change it. It is quicker to drag a few desks than to build a room from nothing.
- Make one plan per layout. Duplicate a plan for a practical lesson, a test and a normal day. A copy keeps the room and the seating, so you only change what is different.
- Check the layout warnings. A red outline and a message under the room tell you when a desk is outside the room, overlaps another, or blocks a door or emergency exit.
- Keep class names tidy. A student in
8Wand another in8 Ware in different classes as far as the builder is concerned. - Add late joiners to the Student List. A new student in the class appears in the Unassigned list of the plan, ready to be seated.
Troubleshooting
The New seating plan button is greyed out. No student has a class yet. Add your class to the Student List first, and give every student a class name.
The page says "Add a class first". The Student List is empty and you have no plans yet. Select Open Student List and add or import your class.
A class is missing from the Class list. The list shows the classes in your Student List. Check the Class column there. A student with no class does not appear in any class.
"A seating plan with this name already exists for the class." Each class needs plans with different names. Choose another name. This also appears if you rename a plan to the name of another and select Save changes. The plan stays unsaved, so change the name and select Save changes again.
Some students did not get a seat. There are fewer seats than students. A message under the room says how many are missing. Add desks, or select a desk and use the + button next to Seat capacity to add a seat.
Arrange put two students together who should be apart. It follows your Keep apart and Keep together rules from Group Maker, but cannot always satisfy all of them, especially in a small room. Select Arrange again, or move students by hand.
Arrange moved a student I wanted to keep. Only locked seats stay put. Place the student where you want them, select the desk, select Seats, and arrange again.
A message says the seat is locked. You dropped a student on a locked seat, or tried to move a student who is sitting in one. Nothing has moved. Select the desk, select Seats to unlock it, and try again.
I made the room smaller and the furniture moved. Furniture cannot sit outside the room, so a smaller room draws it closer together. If desks now overlap, a red outline and a message under the room say so. Select Undo to go back, or move the desks apart by hand.
A layout replaced my room. Selecting a button under Layouts replaces everything. Select Undo in the toolbar straight away to bring your room back.
My plans have disappeared. They are stored in this browser on this device. They will not appear in a different browser, on another computer, or after the browser's data has been cleared. If you made a backup, restore it from Backup & Restore.