The Name Trainer helps you learn students' names from their photos. Use it in the first weeks with a new class: flip through the faces on the bus or at your desk, then test yourself with a quiz or a matching game. It remembers which names you get wrong and shows them more often.
Where your data goes
Everything stays on this device. The names and photos come from the Student List, where they are saved in this browser. Your practice results are saved in this browser too. Nothing is sent anywhere. That also means they are not on your other devices, and clearing the browser's data deletes them. To keep a copy, or to move your data to another computer, use Backup & Restore in the sidebar.
Quick start
- Add your class to the Student List with a photo for each student. The next section shows how.
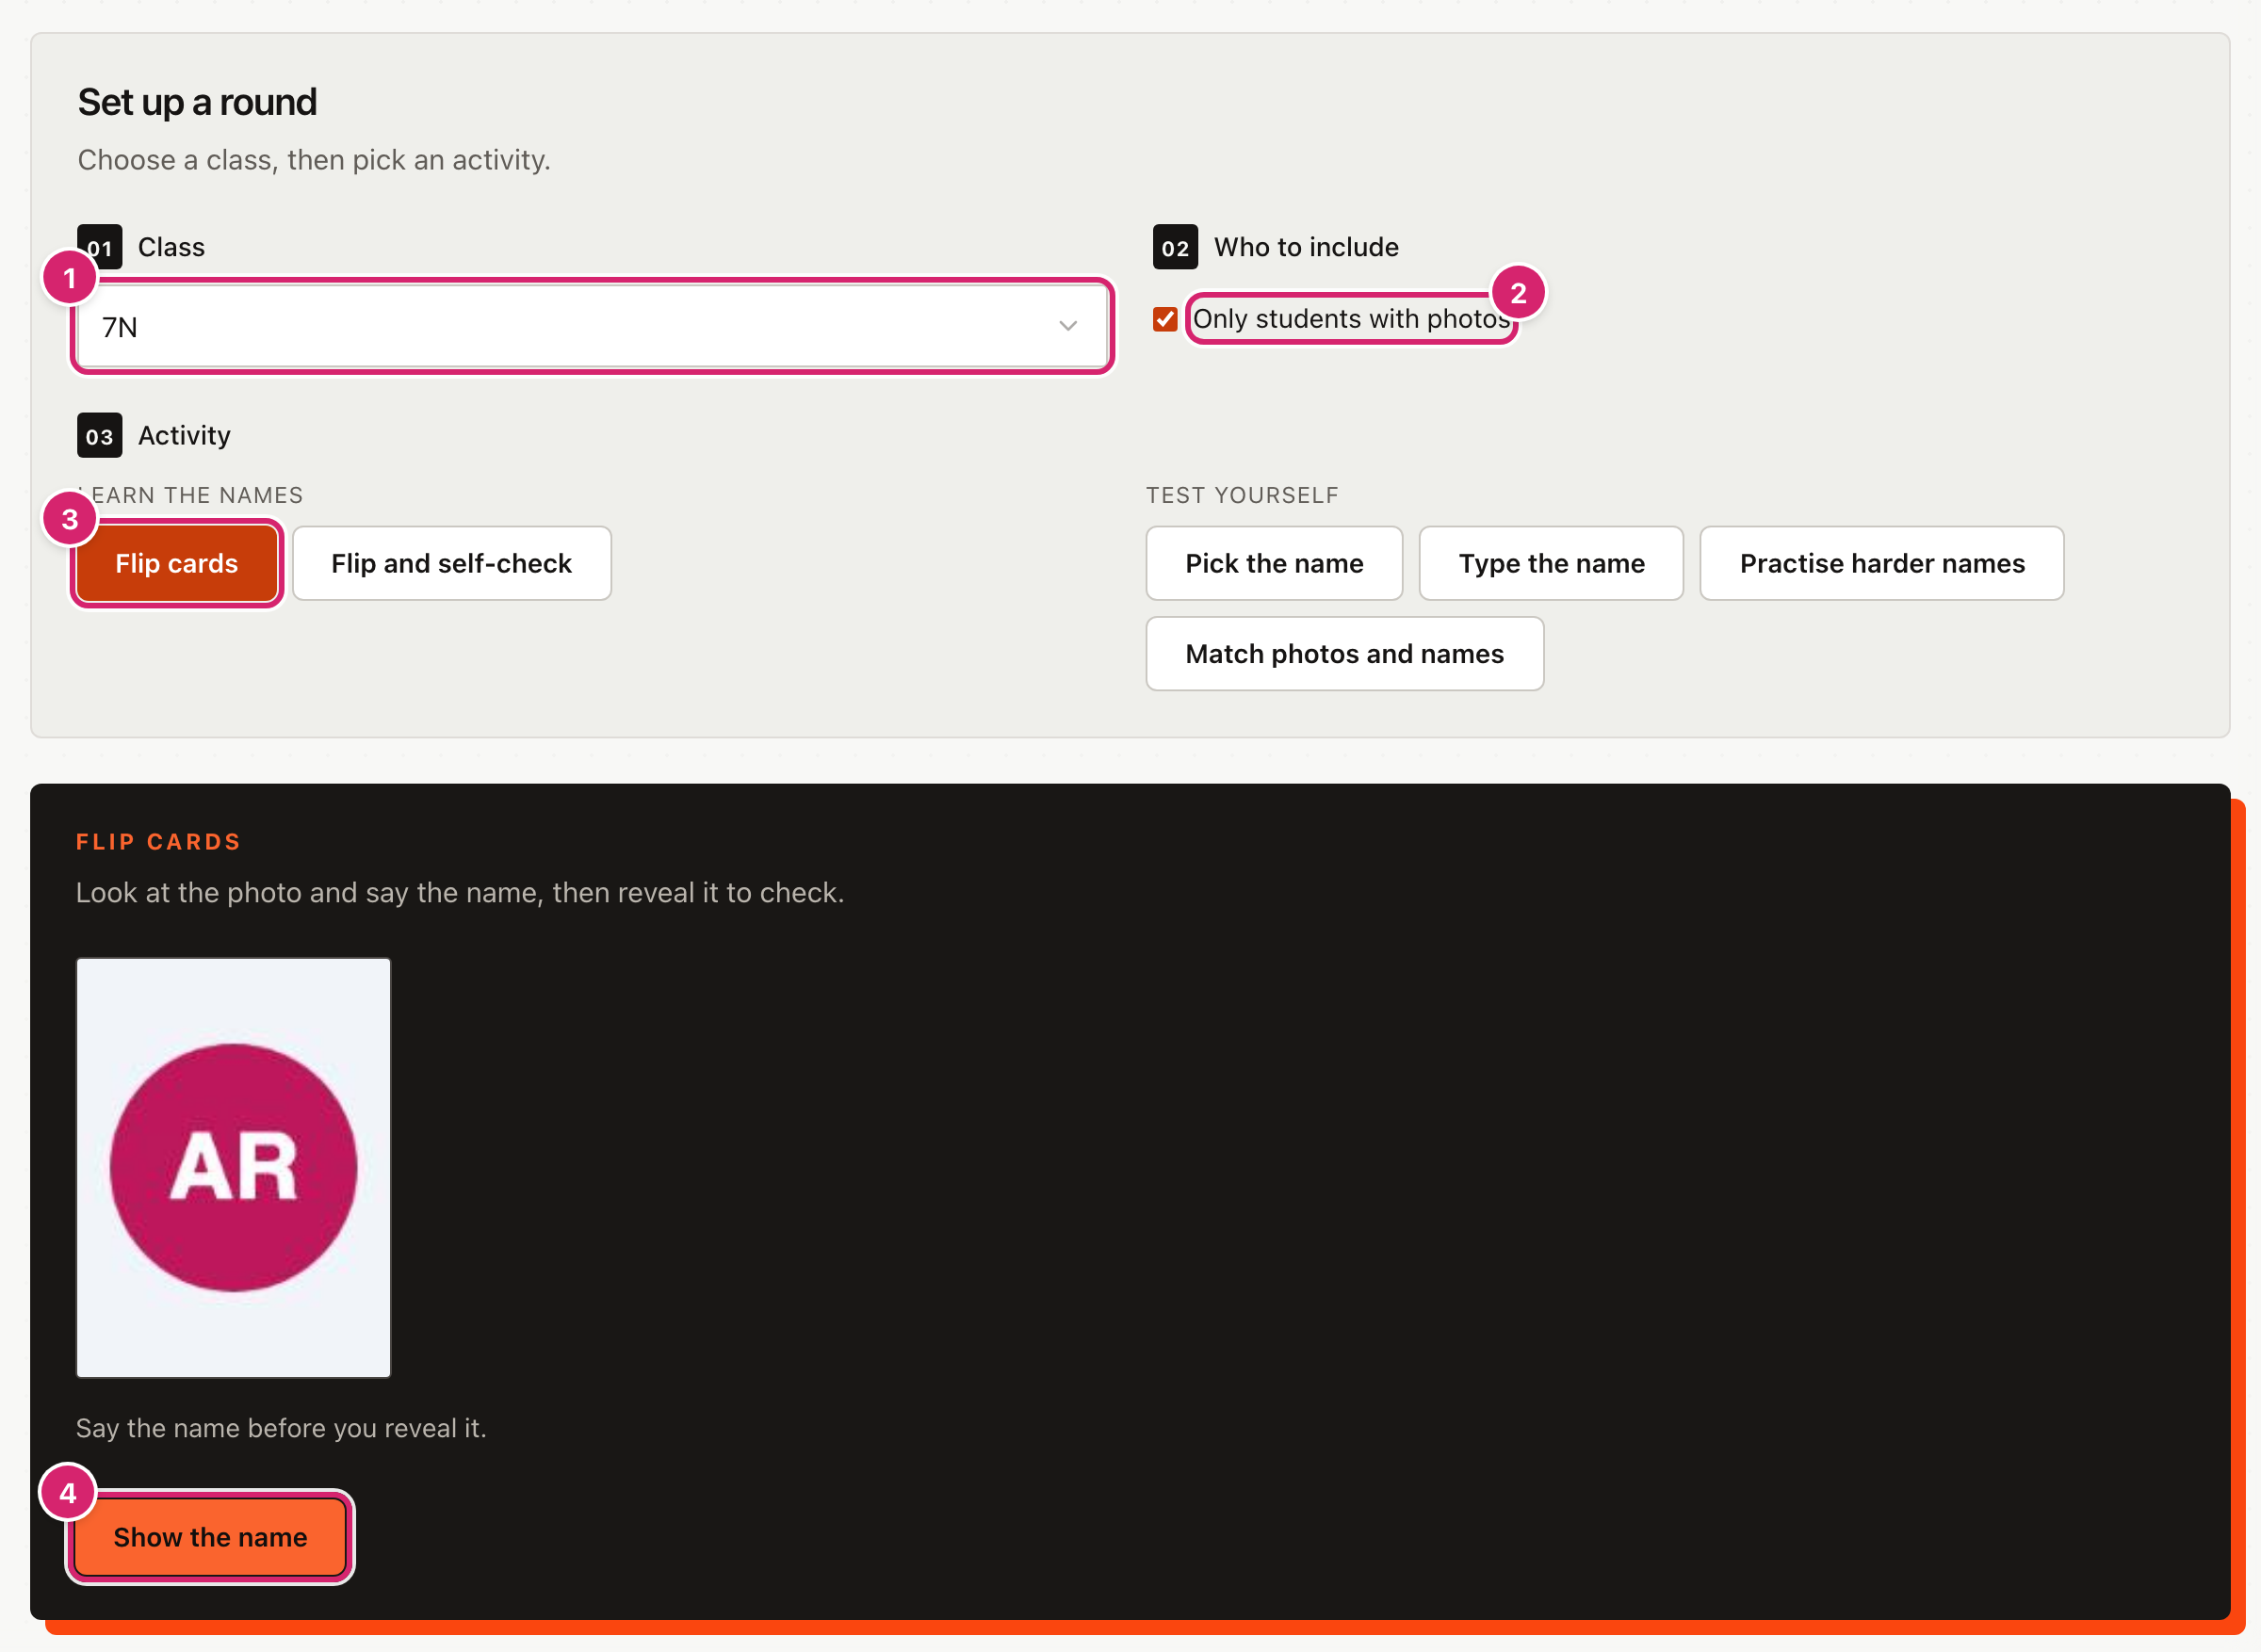
- Open the Name Trainer and choose your class 1.
- Leave Only students with photos 2 ticked.
- Under Activity 3, choose Flip cards.
- Look at the photo and say the name aloud. Then select Show the name 4 to check.
Add photos to your class
The Name Trainer only uses photos that are in the Student List. A student without a photo is left out unless you untick Only students with photos.
- Open the Student List from the sidebar, under Data Sources.
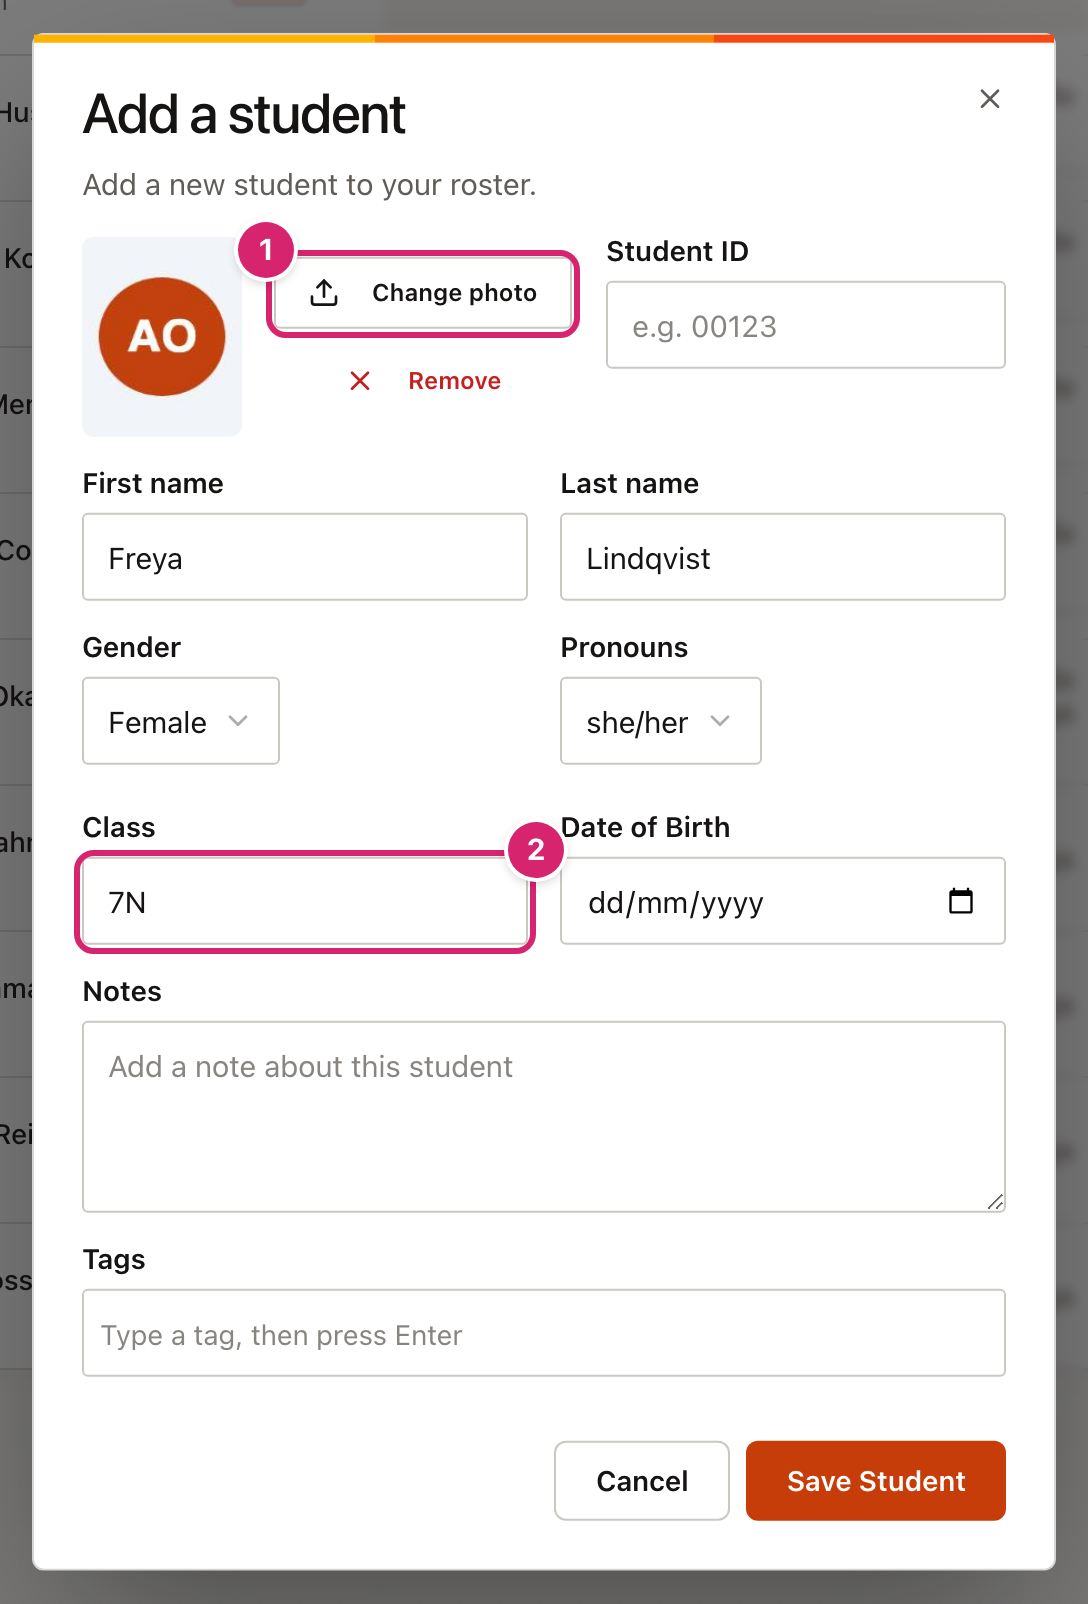
- Select Add Student, or select the ⋯ button on a student's row and then Edit.
- Select Upload 1 and choose an image. Once a photo is in place, the same button reads Change photo. Remove takes the photo away.
- Check the student's Class 2. The Name Trainer groups students by this, and it has to match exactly, so "7N" and "7n " would be different classes.
- Select Save Student.
The photo is shrunk to fit inside a 192-pixel square and saved in this browser, so large photos are fine. A CSV file (a spreadsheet saved as plain text) cannot carry photos, so add them one student at a time. If you use Import iSAMS PDF and your PDF includes photos, they come in with the students.
Learn the names
The two activities under Learn the names show a photo and wait for you to think.
- Flip cards shows a photo. Select Show the name, then Next student. Nothing is scored.
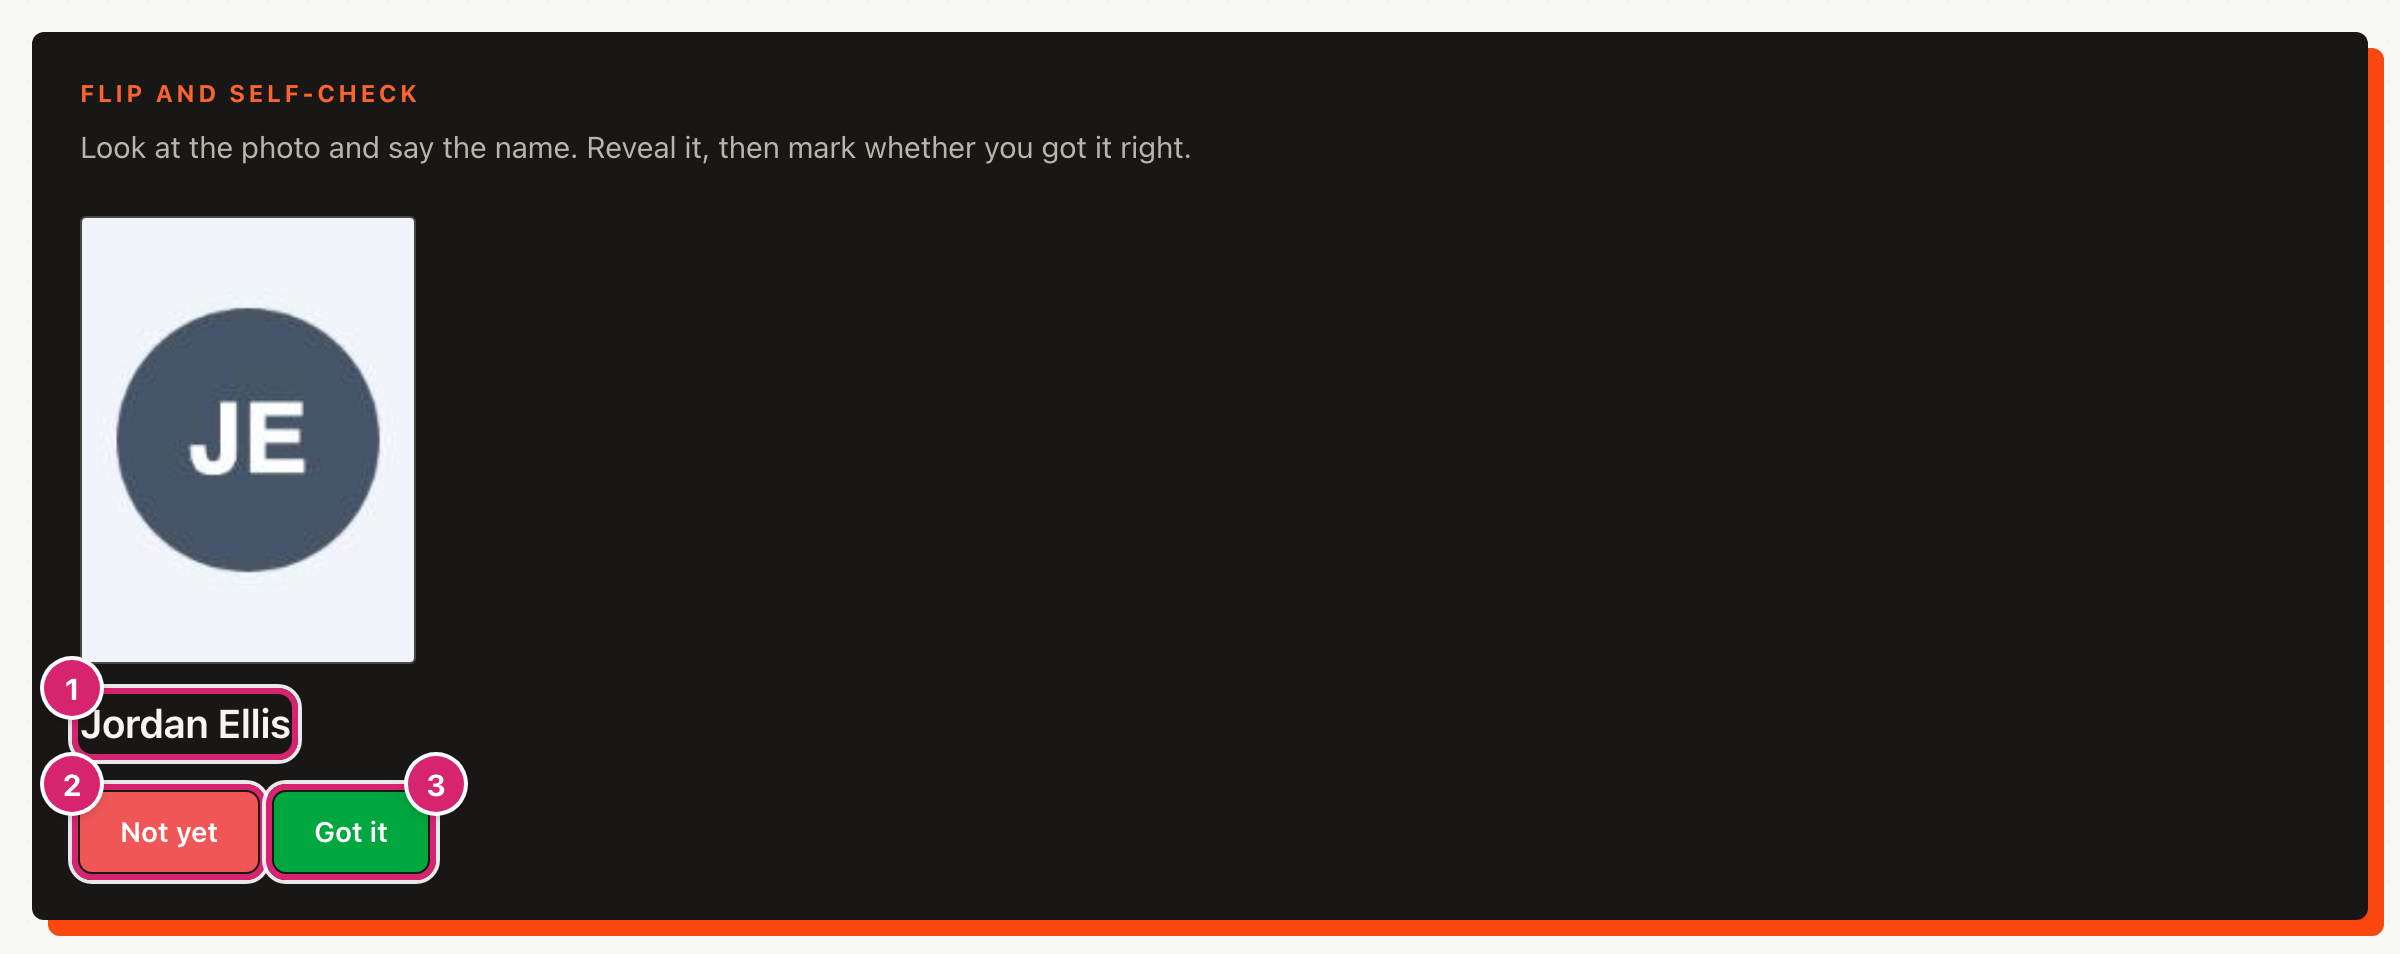
- Flip and self-check works the same way, but after the name appears you mark yourself: Not yet 2 or Got it 3. The name 1 appears once you select Show the name. Your mark is saved, and the next student appears at once.
Students come up at random, and never the same one twice in a row.
Test yourself
The activities under Test yourself check what you remember.
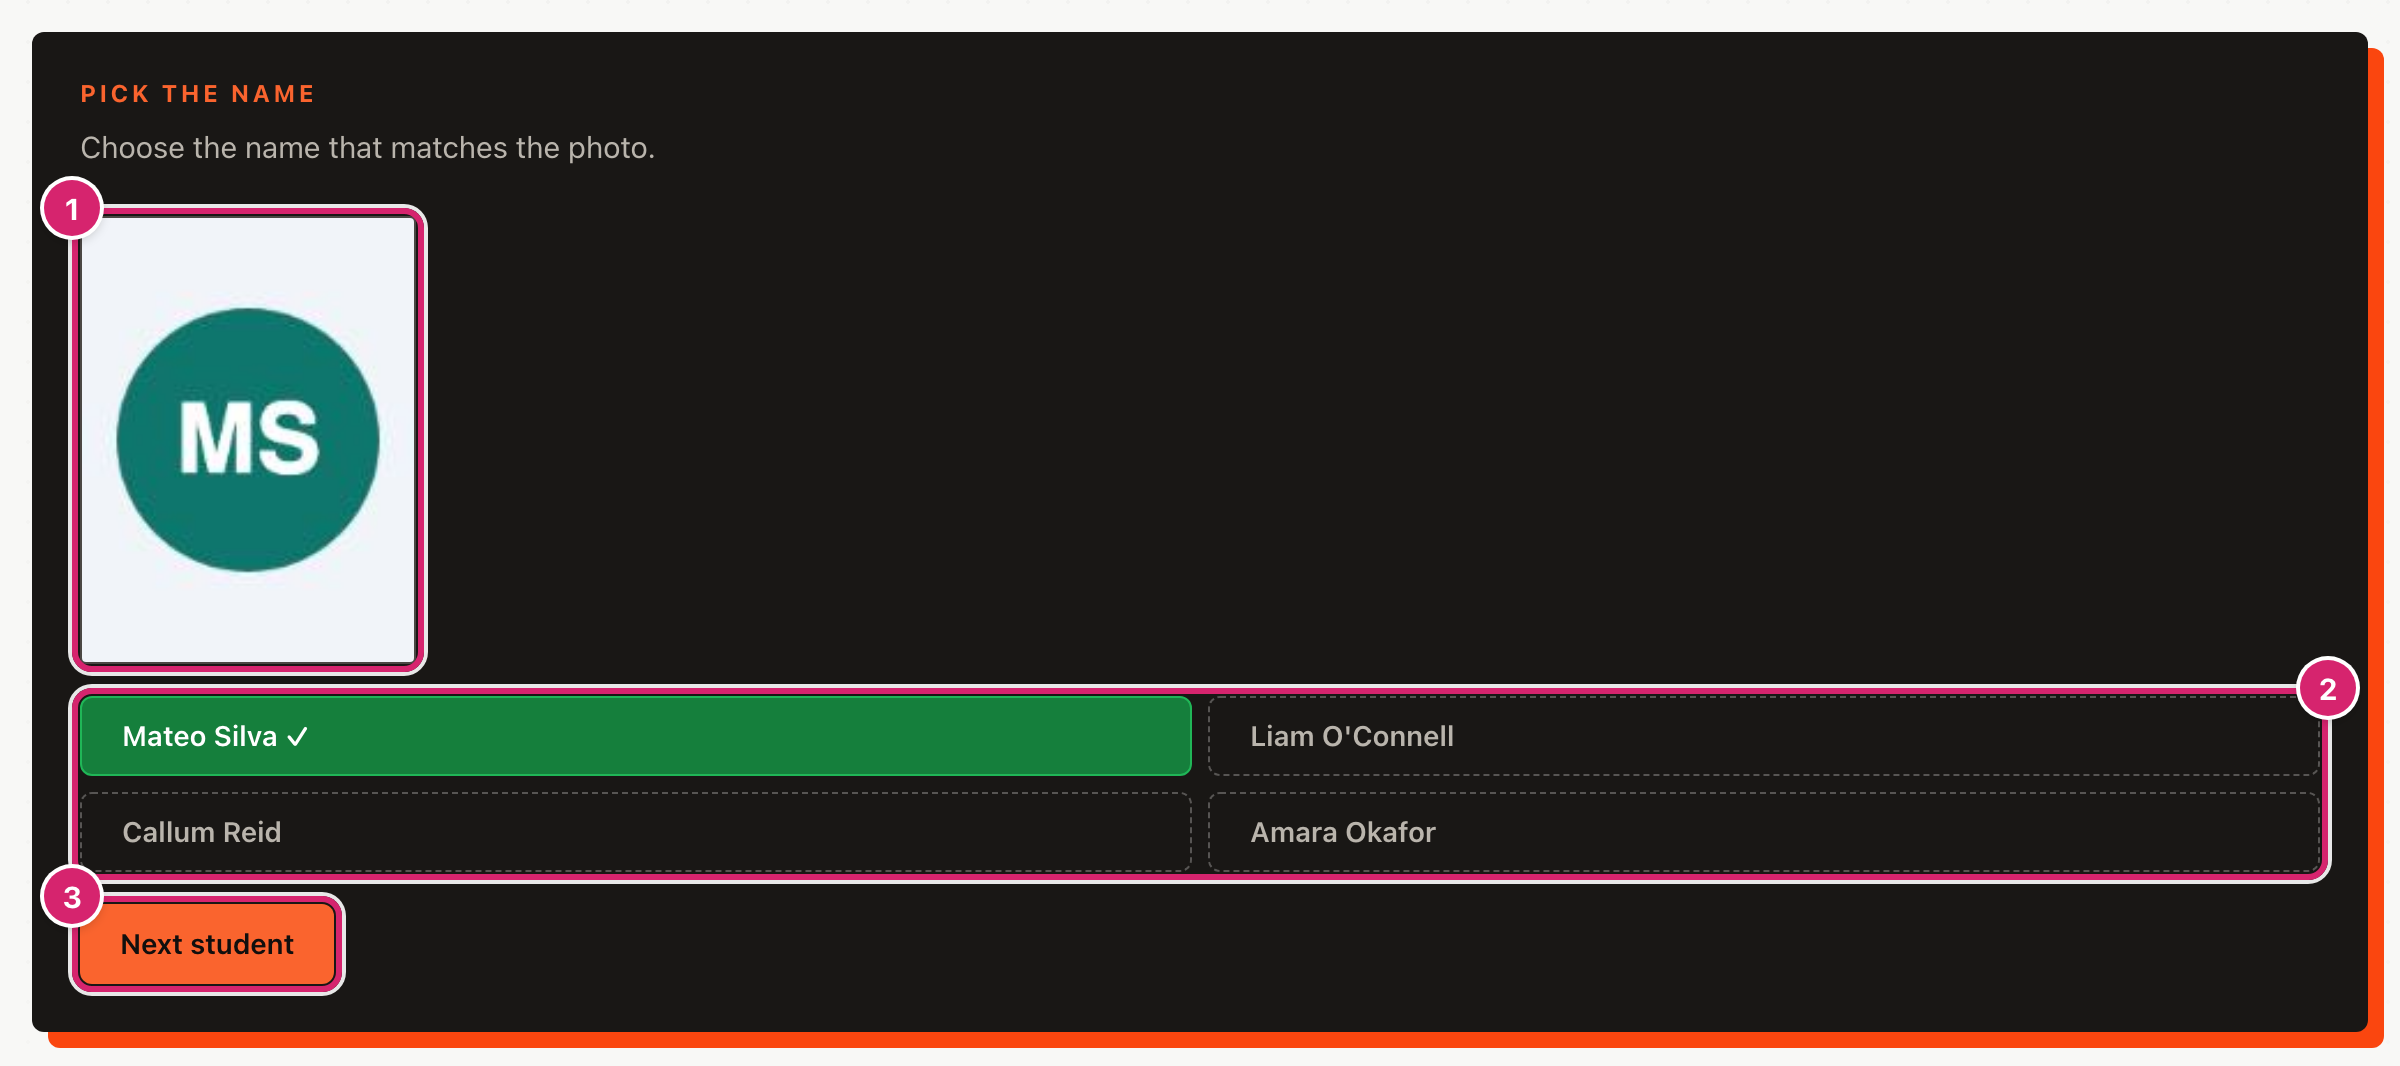
- Pick the name shows a photo 1 and up to four names 2. Select one. The right answer is ticked, and a wrong choice is shown in red. Then select Next student 3.
- Type the name shows a photo and a box. Type the full name, first name then last name, and select Check. Capital letters and extra spaces do not matter. The tool says "Correct." or tells you the answer.
- Practise harder names works like Pick the name, but names you have missed, or not tried yet, come up more often.
Pick the name and Practise harder names need at least two students. Next student is always available, so you can skip a photo without answering. A skipped photo is not scored.
Match photos and names
Match photos and names puts up to six photos on a board with their names in a different order.
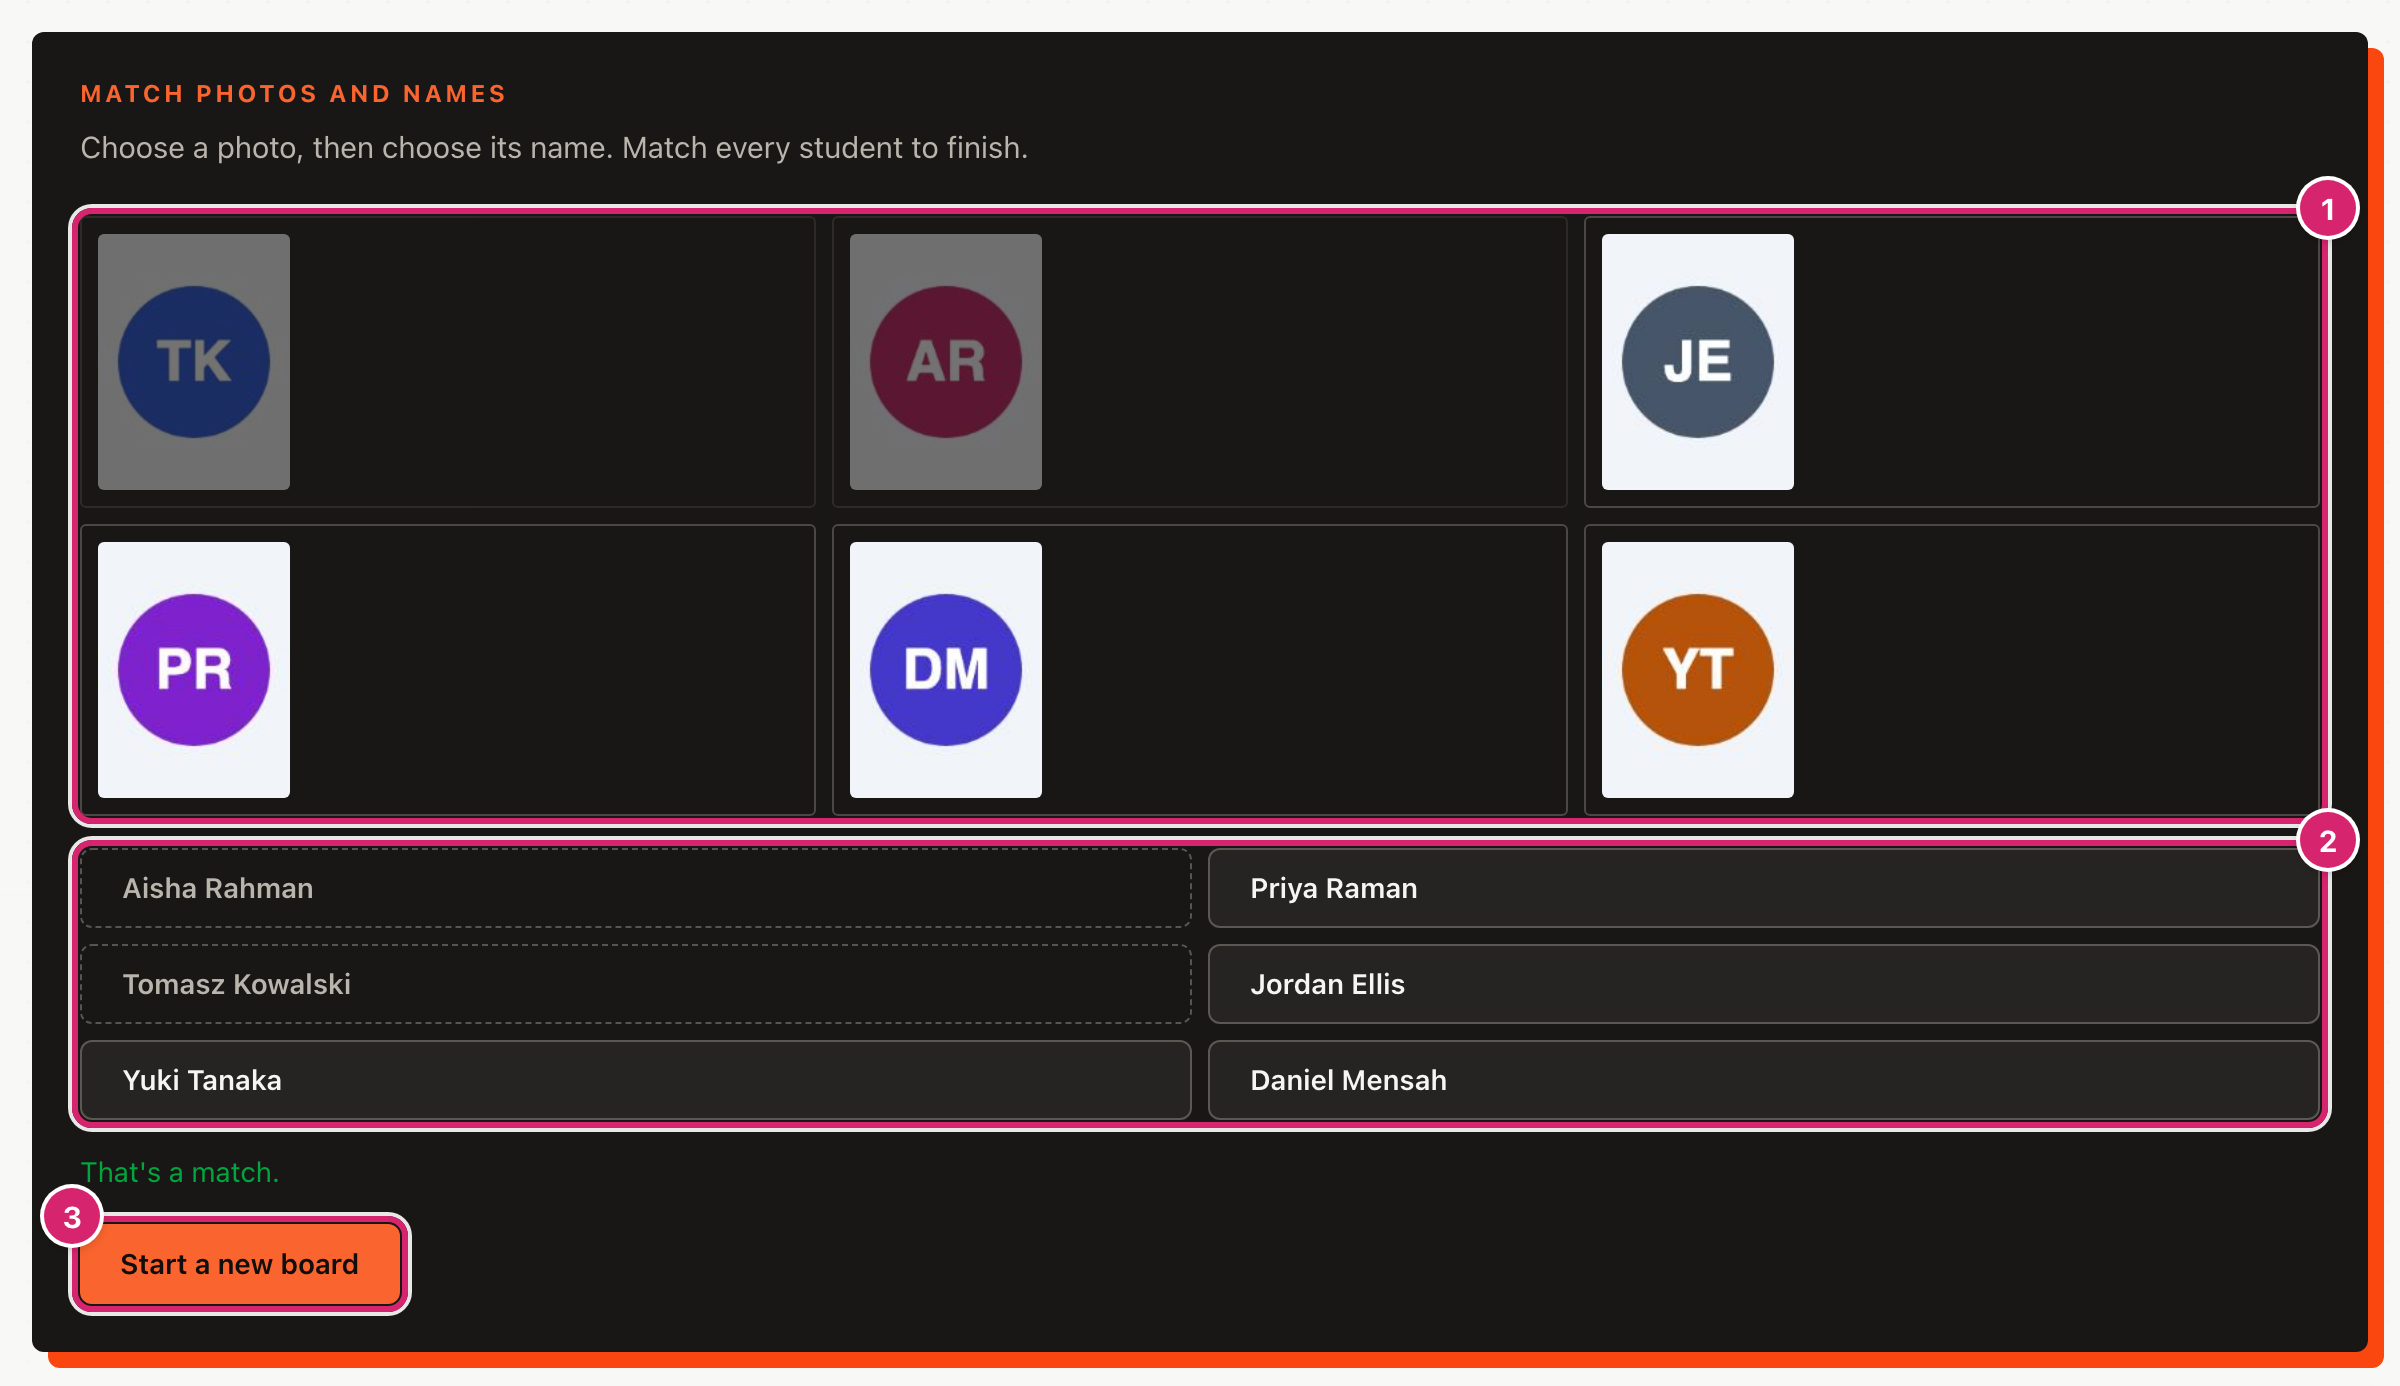
- Select a photo 1 first.
- Select the name 2 you think goes with it. A green "That's a match." means you are right, and both fade out. Otherwise you see "Those don't match. Try another pair."
- Keep going until every student is matched. "All matched." appears.
- Select Start a new board 3 for a different set of students.
Always choose the photo first. If you choose a name first, nothing is checked until you choose a photo and then select a name again.
See which names you know
Your progress is at the bottom of the page.
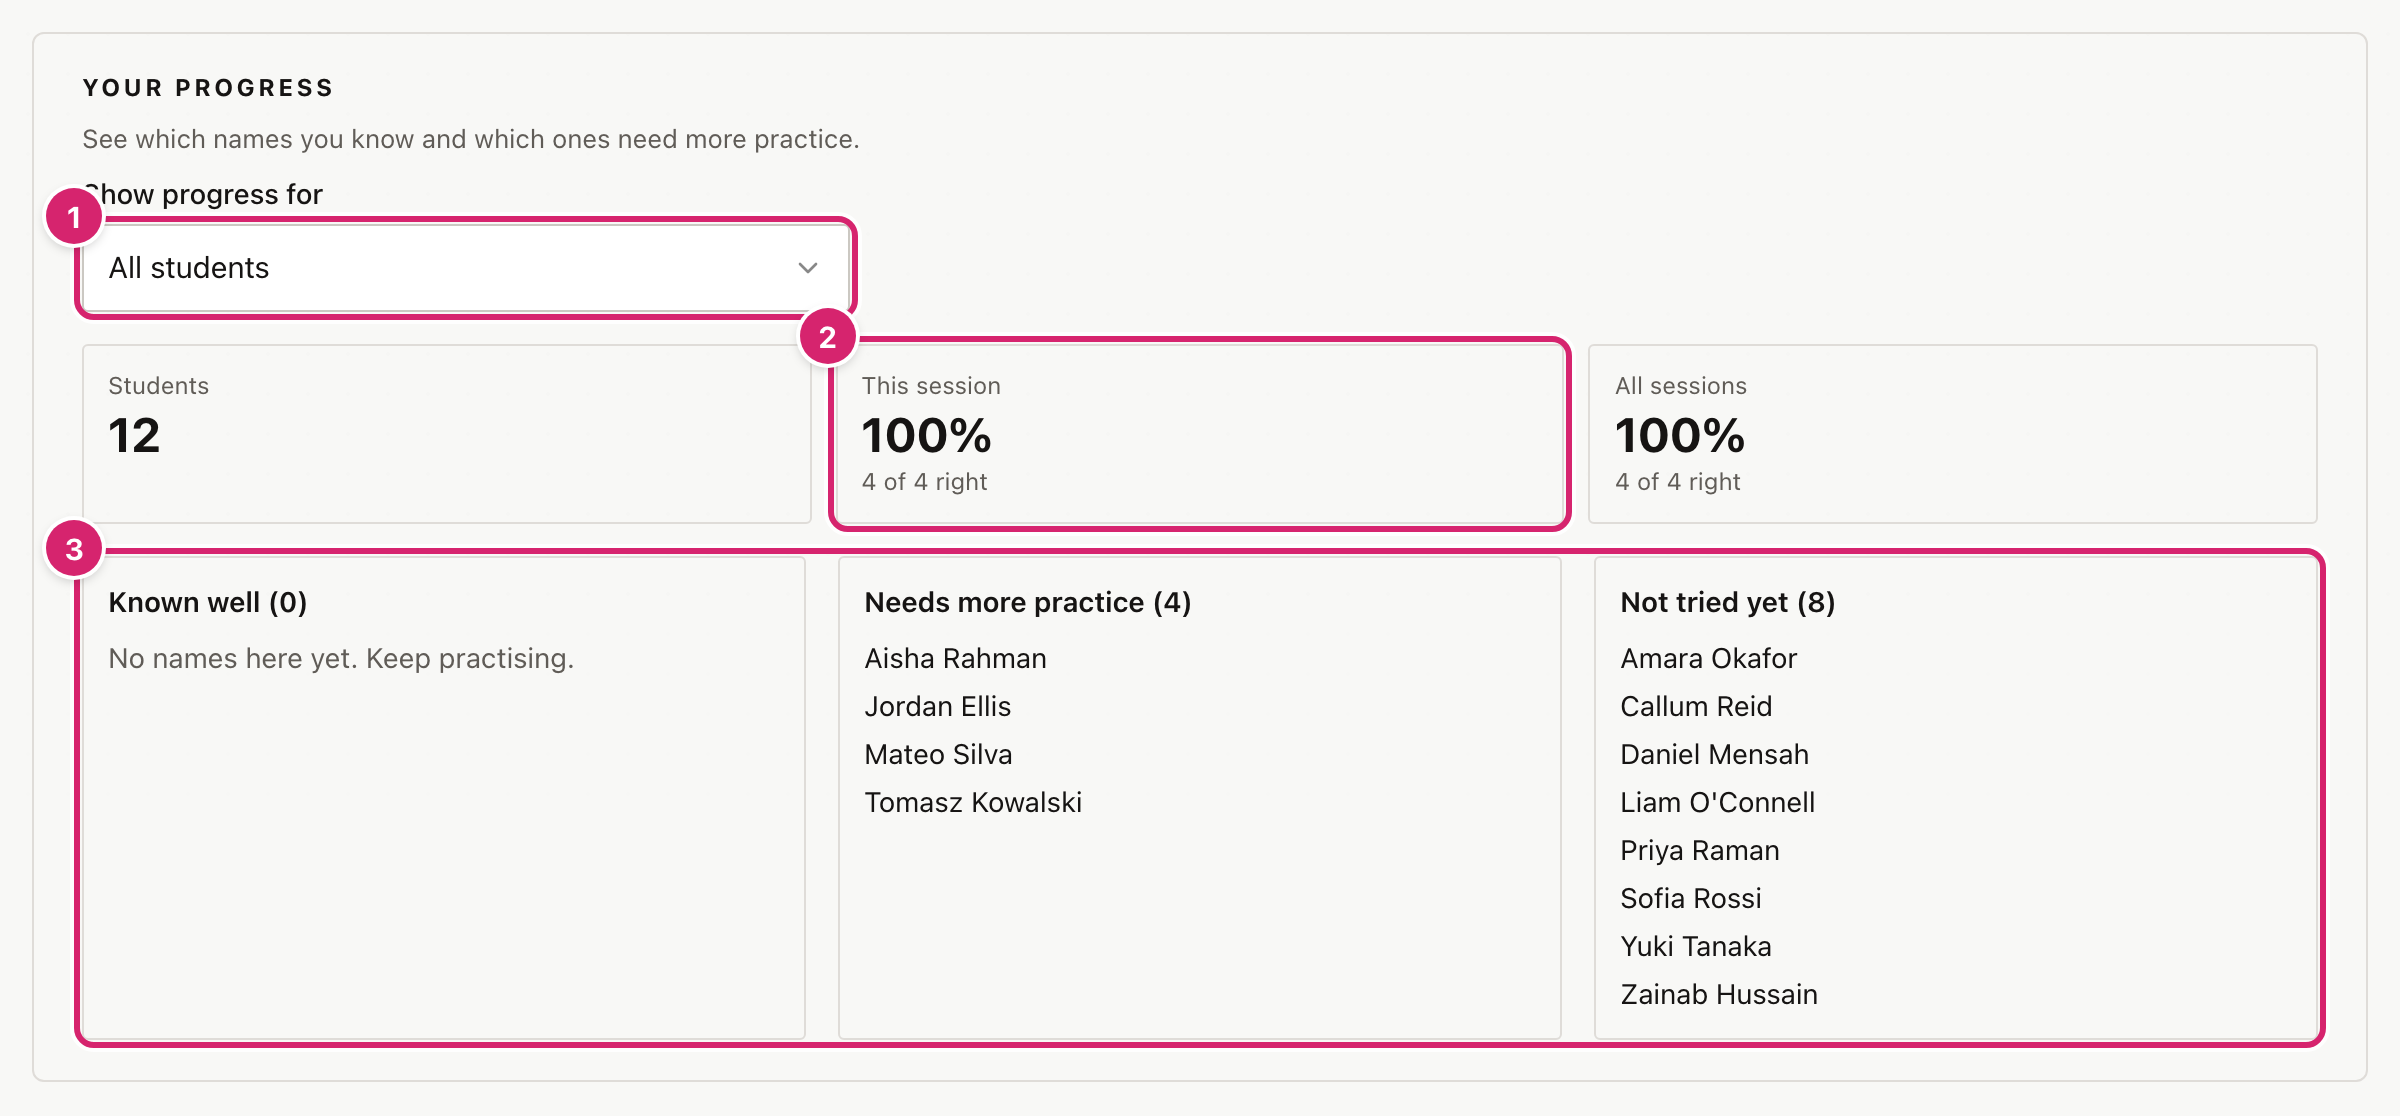
- Show progress for 1 chooses a class, or all your students. It counts every student in that class, with or without a photo.
- This session 2 shows how many you got right since you opened the page. All sessions adds up every time you have practised in this browser.
- The three lists 3 sort students. Known well needs at least four tries with 85% or more right. Needs more practice is anyone you have tried who is not yet known well. Not tried yet is everyone else.
Only Flip and self-check, the quizzes and Match photos and names are scored. Flip cards and skipped photos are not.
Tips
- Start small. Practise one class at a time. A class of thirty is easier in two or three short sessions than one long one.
- Say the name aloud. In the flip activities, saying it before you reveal it is what makes it stick.
- Use "Practise harder names" last. It is built from your results, so it works best after you have done a few rounds of the others.
- Mind the screen. The photos fill the page. If you are sharing your screen or projecting, close the Name Trainer first.
- Check your school's guidance on photos. The photos you upload are student data. They stay in this browser, but you should still follow your school's policy on holding them.
Troubleshooting
"No students match these settings." There are no students in that class with a photo. Add photos in the Student List, or untick Only students with photos.
"This activity needs at least two students." Pick the name, Practise harder names and Match photos and names need two or more students in the class you chose. Choose another class, untick Only students with photos, or add students.
A photo box says "No photo on file". You unticked Only students with photos, so students without one are included. Tick it again, or add their photo in the Student List.
Type the name says I am wrong but I typed it correctly. The name must match the Student List exactly, apart from capital letters and extra spaces. Accents, hyphens and apostrophes count, so check how the name is spelled there. The answer is shown after you select Check.
The photo looks cropped. The Name Trainer shows photos in a tall, narrow frame, and trims anything that does not fit. Use a portrait photo with the face in the middle.
Nothing happens when I select a name in Match photos and names. Select the photo first, then the name.
My progress has gone back to zero. Progress is stored in this browser. It will not appear in a different browser or on another computer, or after the browser's data has been cleared. If you delete a student and add them again, they start again as Not tried yet.