The Flashcard Maker turns a list of terms and definitions into a PDF of printable flashcards. Use it to make revision cards for a Year 8 science test, key vocabulary for a language lesson, or a matching game for a lesson starter. The terms go on the front of each card and the definitions on the back, lined up so that you can print double-sided.
Where your data goes
Everything stays on this device. Your decks, your Vocabulary Bank and your style settings are saved in this browser. The PDF is built in the browser too, so your words are not sent anywhere. That also means they are not on your other devices, and clearing the browser's data deletes them. To keep a copy, or to move your decks to another computer, use Backup & Restore in the sidebar.
Quick start
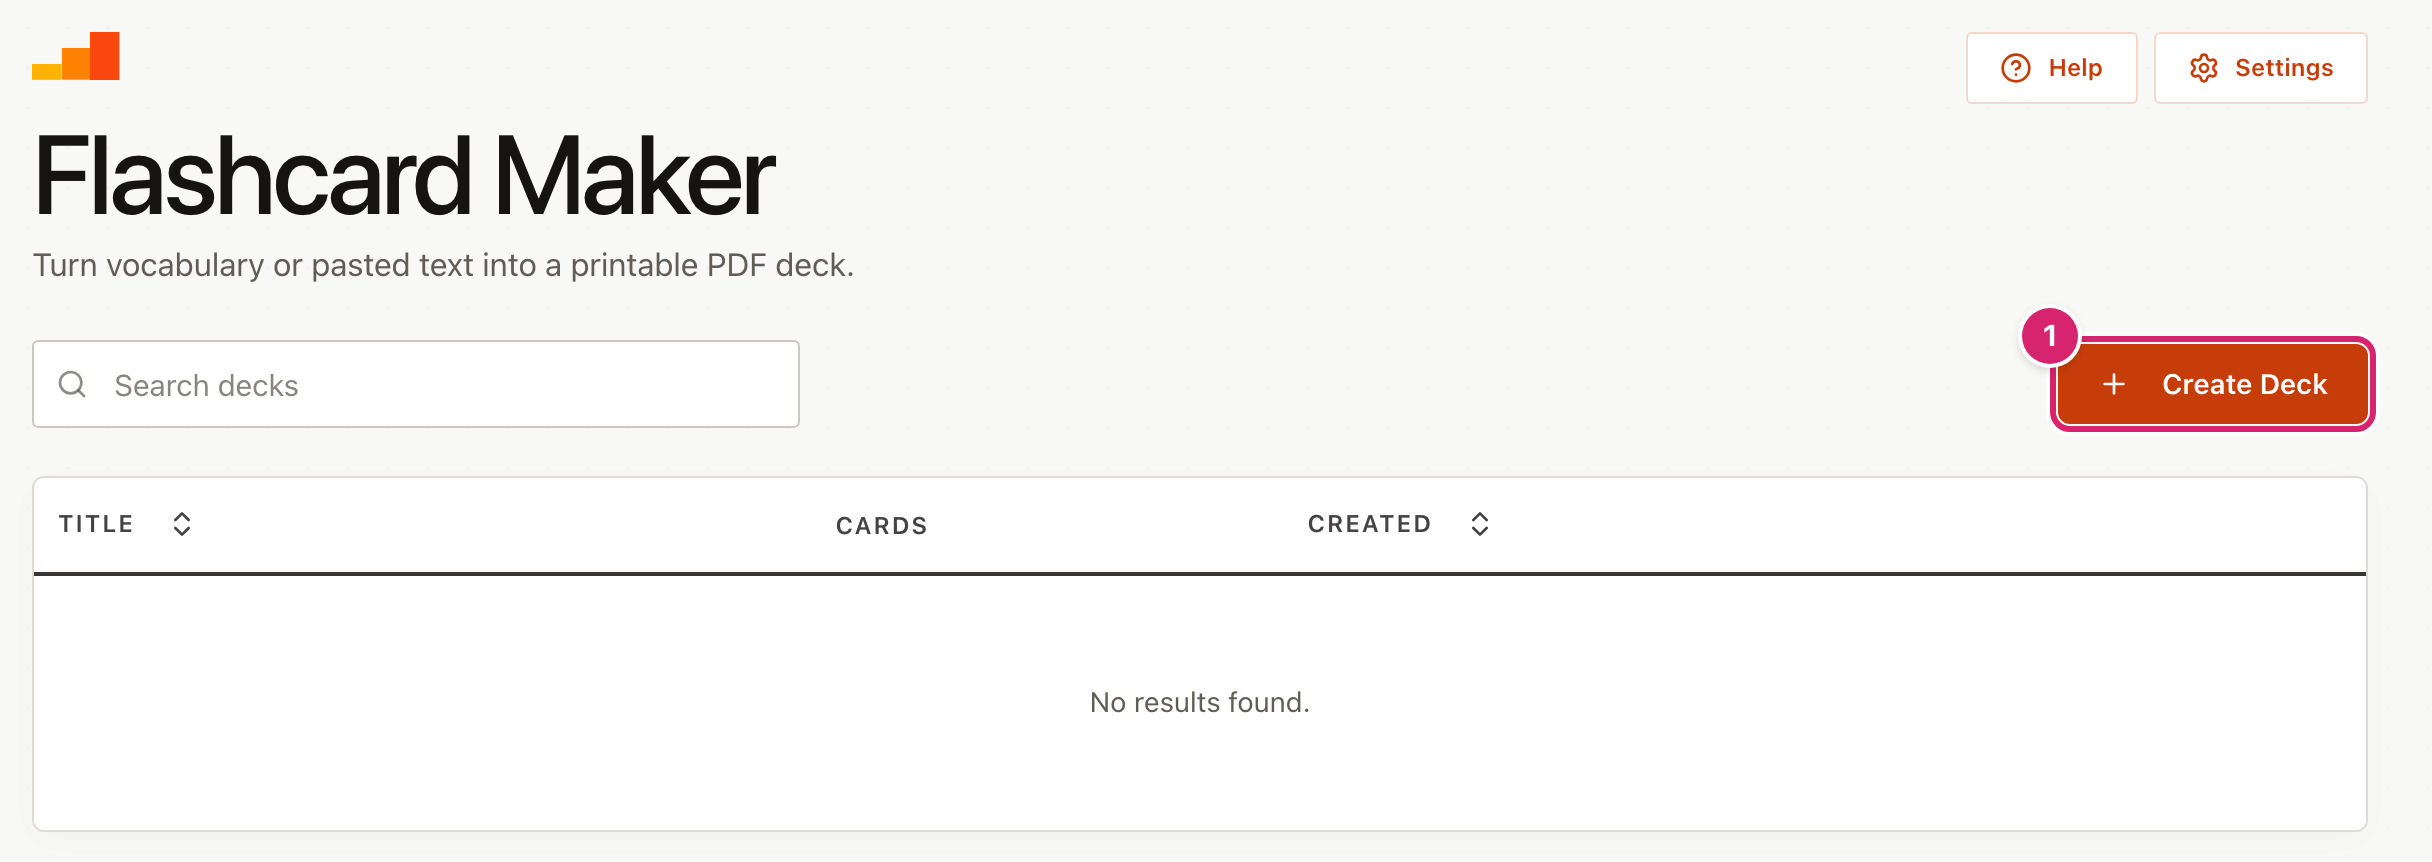
- Select Create Deck 1.
- Type a name for the deck.
- Select Add Multiple, then Paste List. Paste your words with one card per line, such as
Conductor - A material that lets electricity flow through it, and select Import Cards. - Look at the preview on the right.
- Select Download PDF to get the cards, and Save to keep the deck.
Make a deck
When you select Create Deck, a window opens with your cards on the left and a preview of the printed pages on the right.
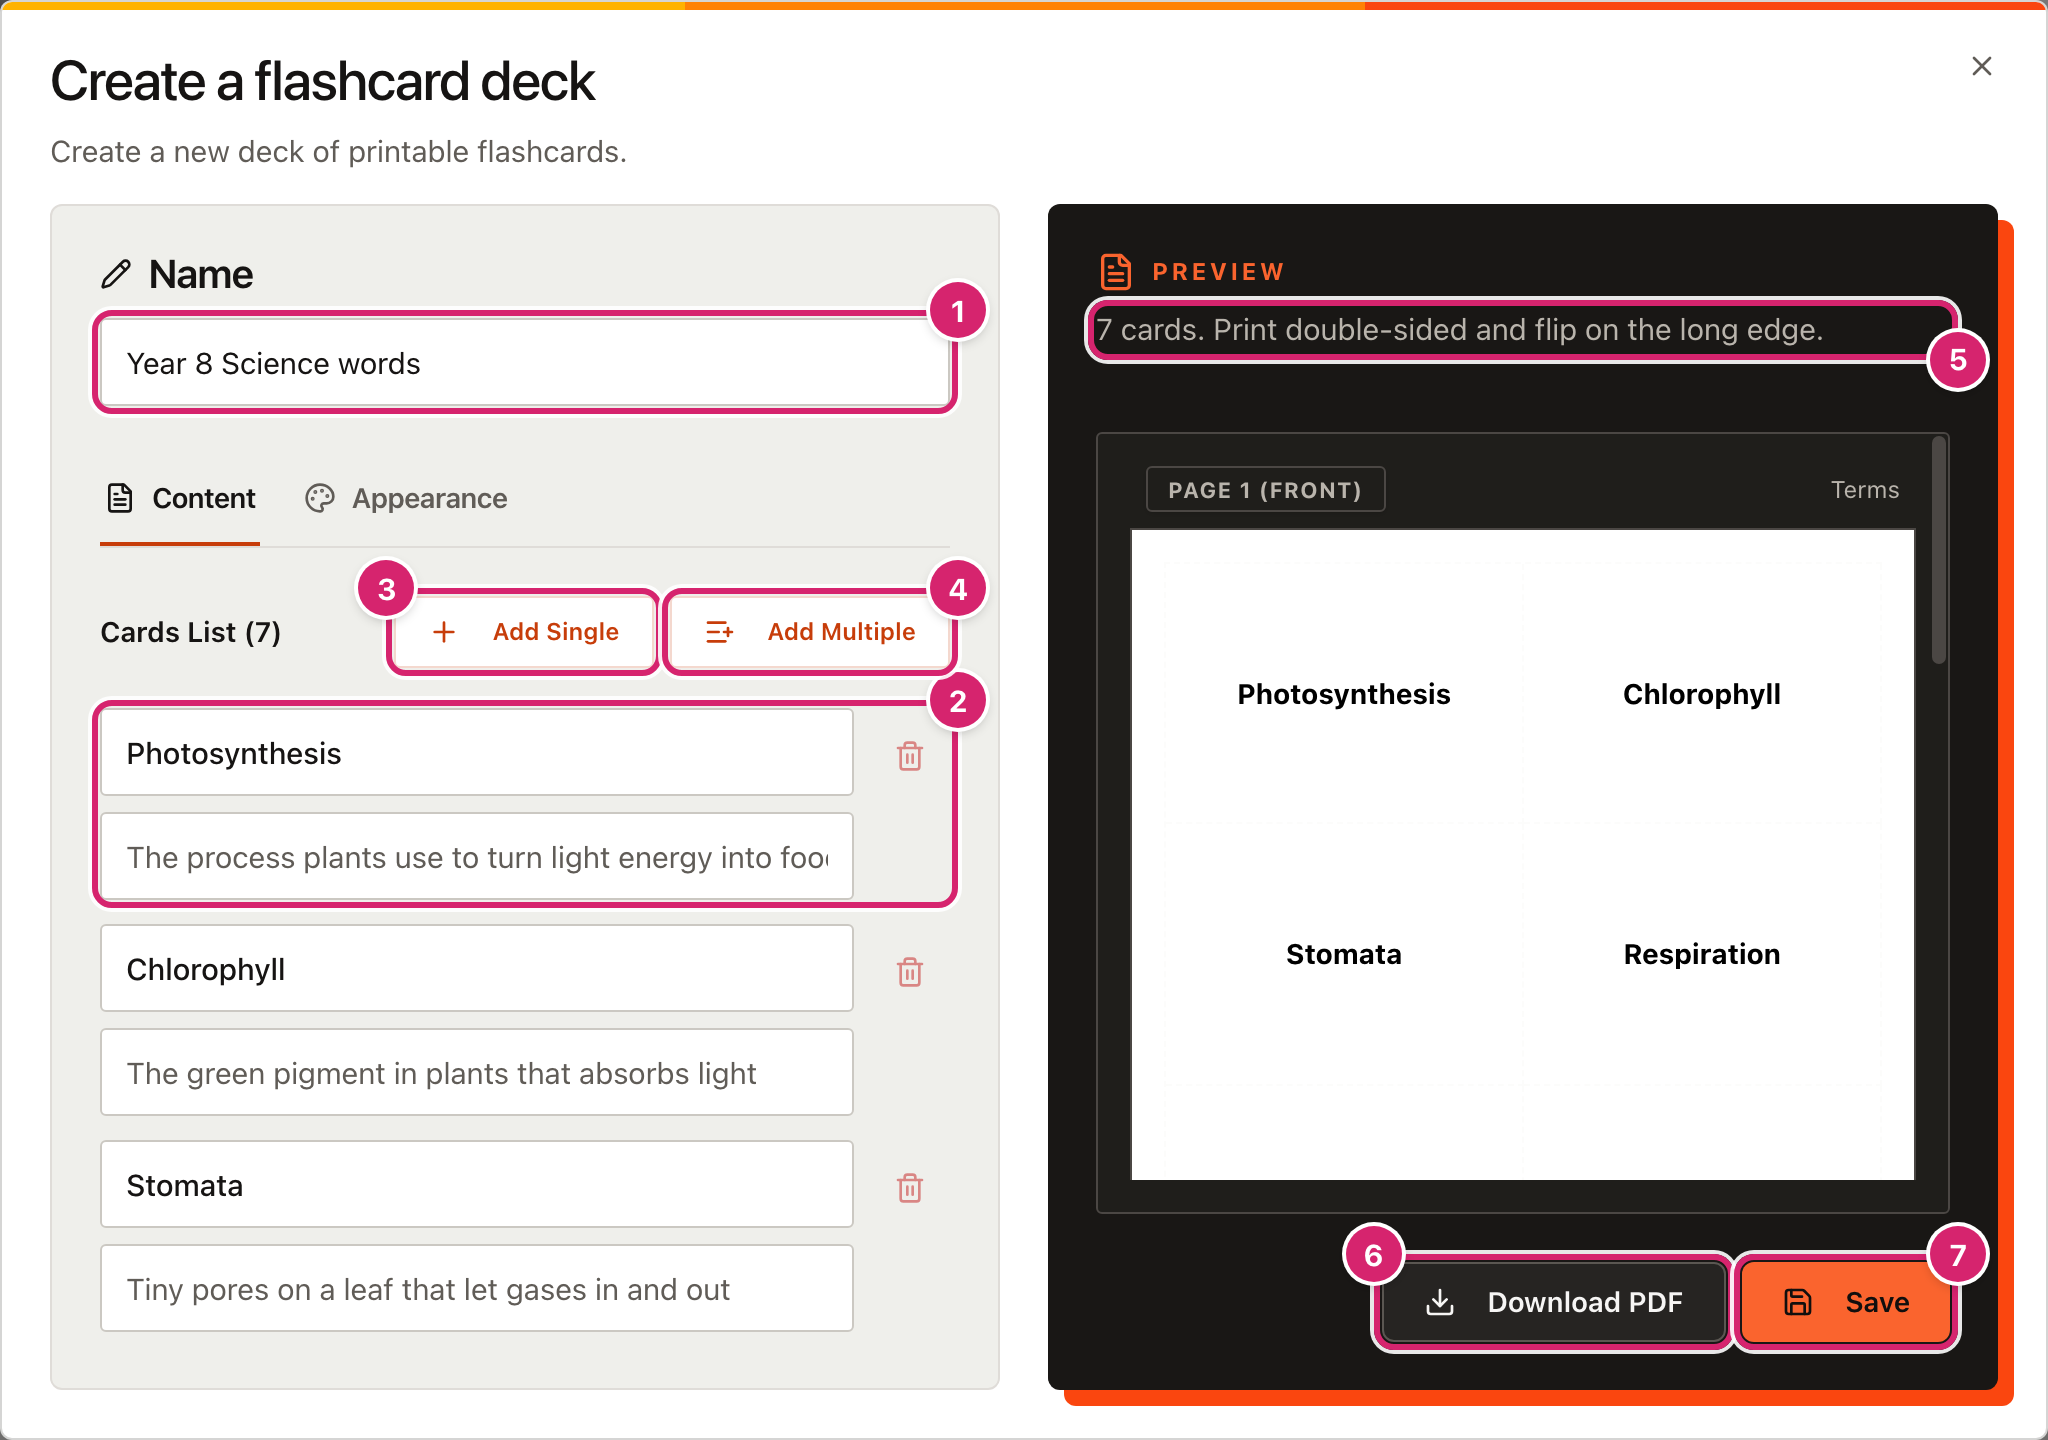
- Type the deck's name 1. It is also the name of the PDF file.
- Each card 2 has a Term and a Definition. Type straight into the boxes. The bin button beside a card removes it.
- Select Add Single 3 to add an empty card at the end.
- Select Add Multiple 4 to add many at once. The next two sections cover its two choices.
- The preview 5 shows the printed pages as you work. It tells you how many cards you have. Cards with nothing typed in them are left out.
- Select Download PDF 6 to save the cards as a PDF. This works without saving the deck first, and it needs at least one card.
- Select Save 7 to keep the deck in your list. Save is switched off until the deck has a name and at least one card. Saving closes the window.
Paste a list
Paste List is the quickest way to add a lot of cards. Copy a list from a document or a spreadsheet and paste it in.
- Select Add Multiple, then Paste List.
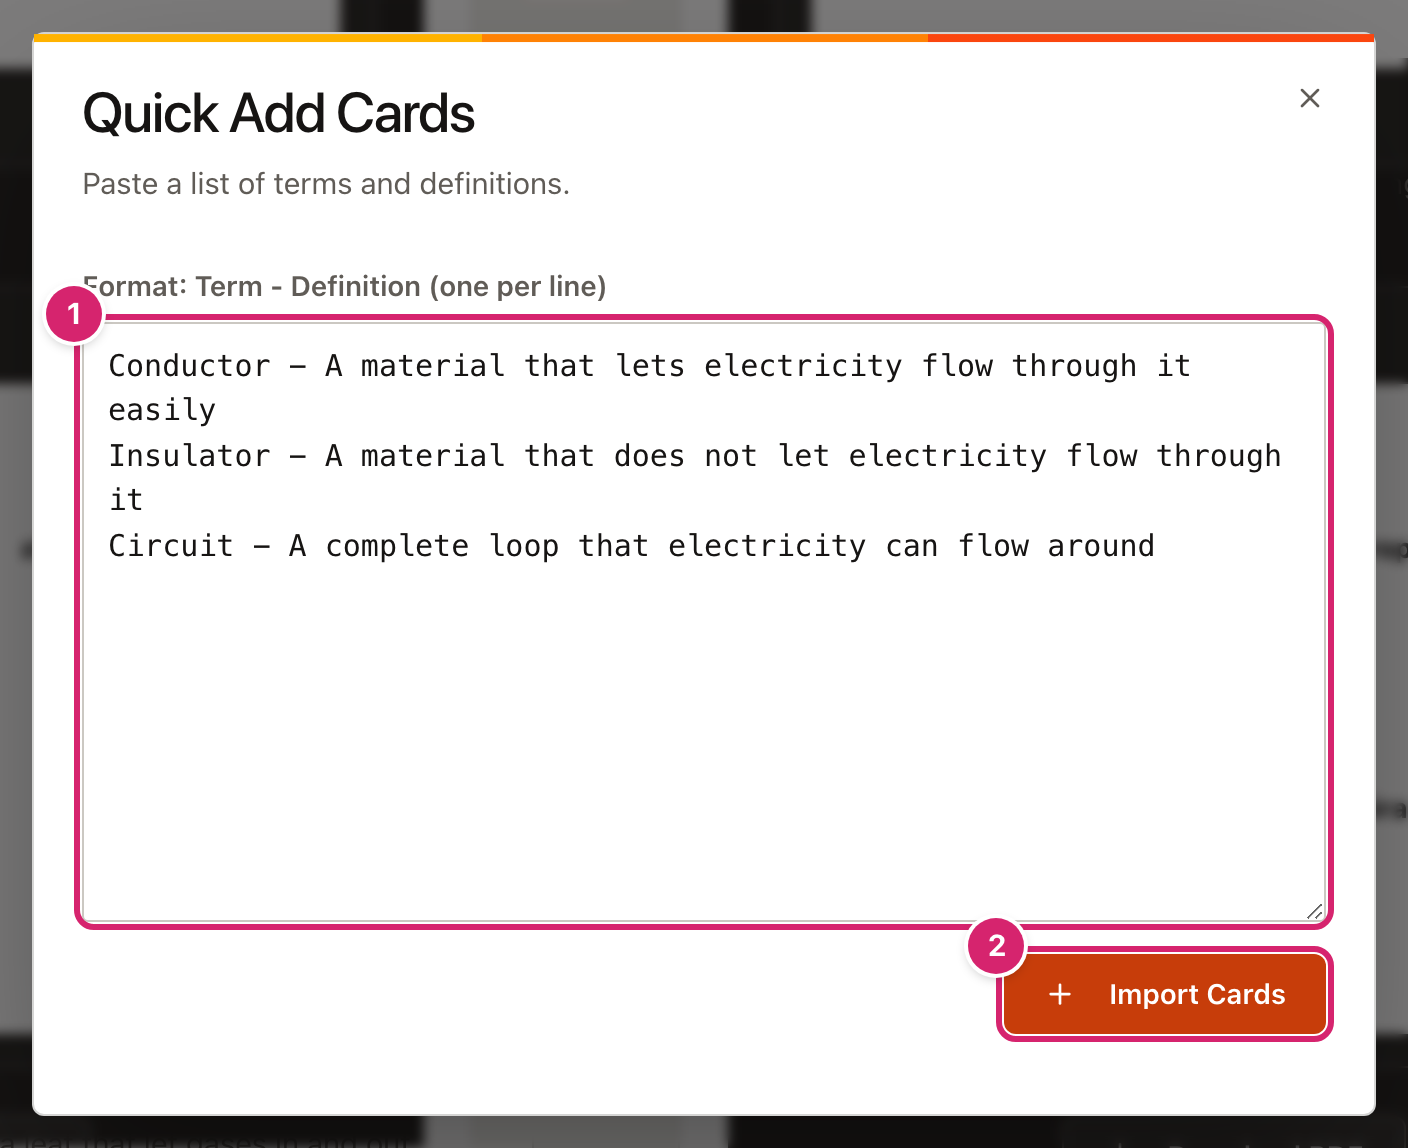
- Type or paste your list into the box 1, one card on each line. Put a space, a dash and a space between the term and the definition, as in
Insulator - A material that does not let electricity flow through it. A colon with a space on each side (:) works too, and so does a tab, which is what you get when you copy two columns from a spreadsheet. - Select Import Cards 2. The new cards are added after the ones you already have.
A line with no separator becomes a term with an empty definition. A hyphen inside a word, such as "well-being", is fine, because the dash needs a space on each side. Any empty cards in the deck are cleared out when you import.
Use words from the Vocabulary Bank
If you keep your words in the Vocabulary Bank, you can add a whole topic at once. The Vocabulary Bank is in the sidebar. Add words there with Add Term, or import a CSV (a spreadsheet saved as plain text) with the columns term, definition, example and tags. Separate several tags with a semicolon.
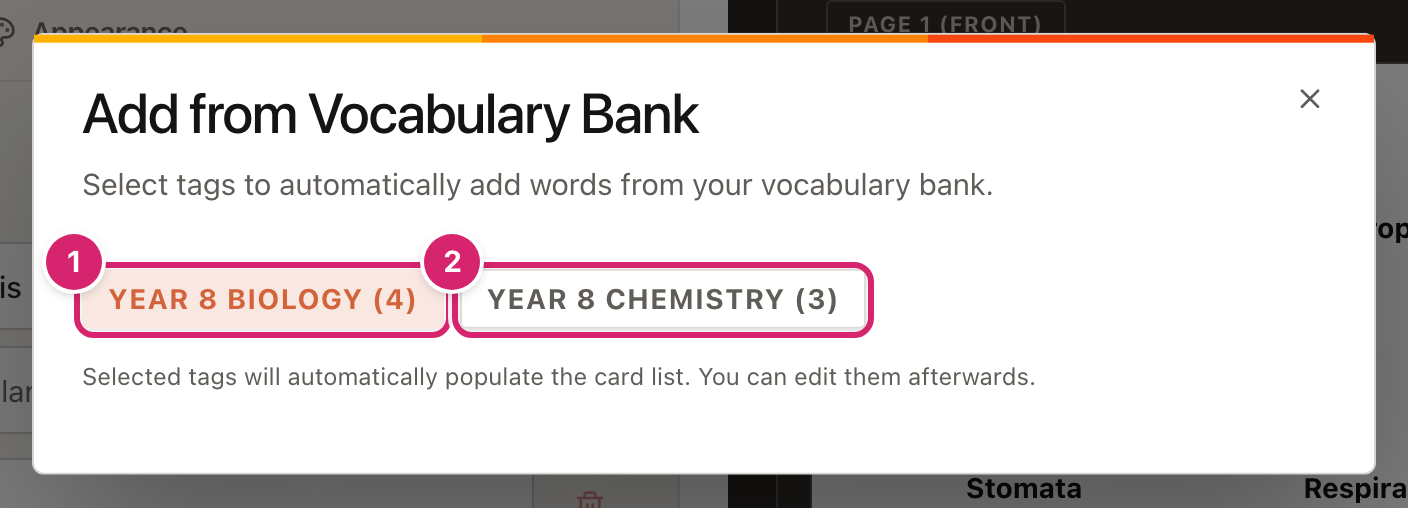
- Select Add Multiple, then From Vocabulary Bank.
- Select a tag 1 to add every word with that tag. The number in brackets is how many words it has. Words that are already in the deck are not added twice.
- Select a tag again to take its cards out. This removes all the cards that came from that tag, including any you have edited.
- A tag you have not selected 2 adds nothing until you select it. Words with no tag do not appear here.
Only the term and the definition come across. The example sentence is not put on the cards. You can edit the cards afterwards.
Change how the cards look
The Appearance tab changes the layout and colours. The preview updates as you go.
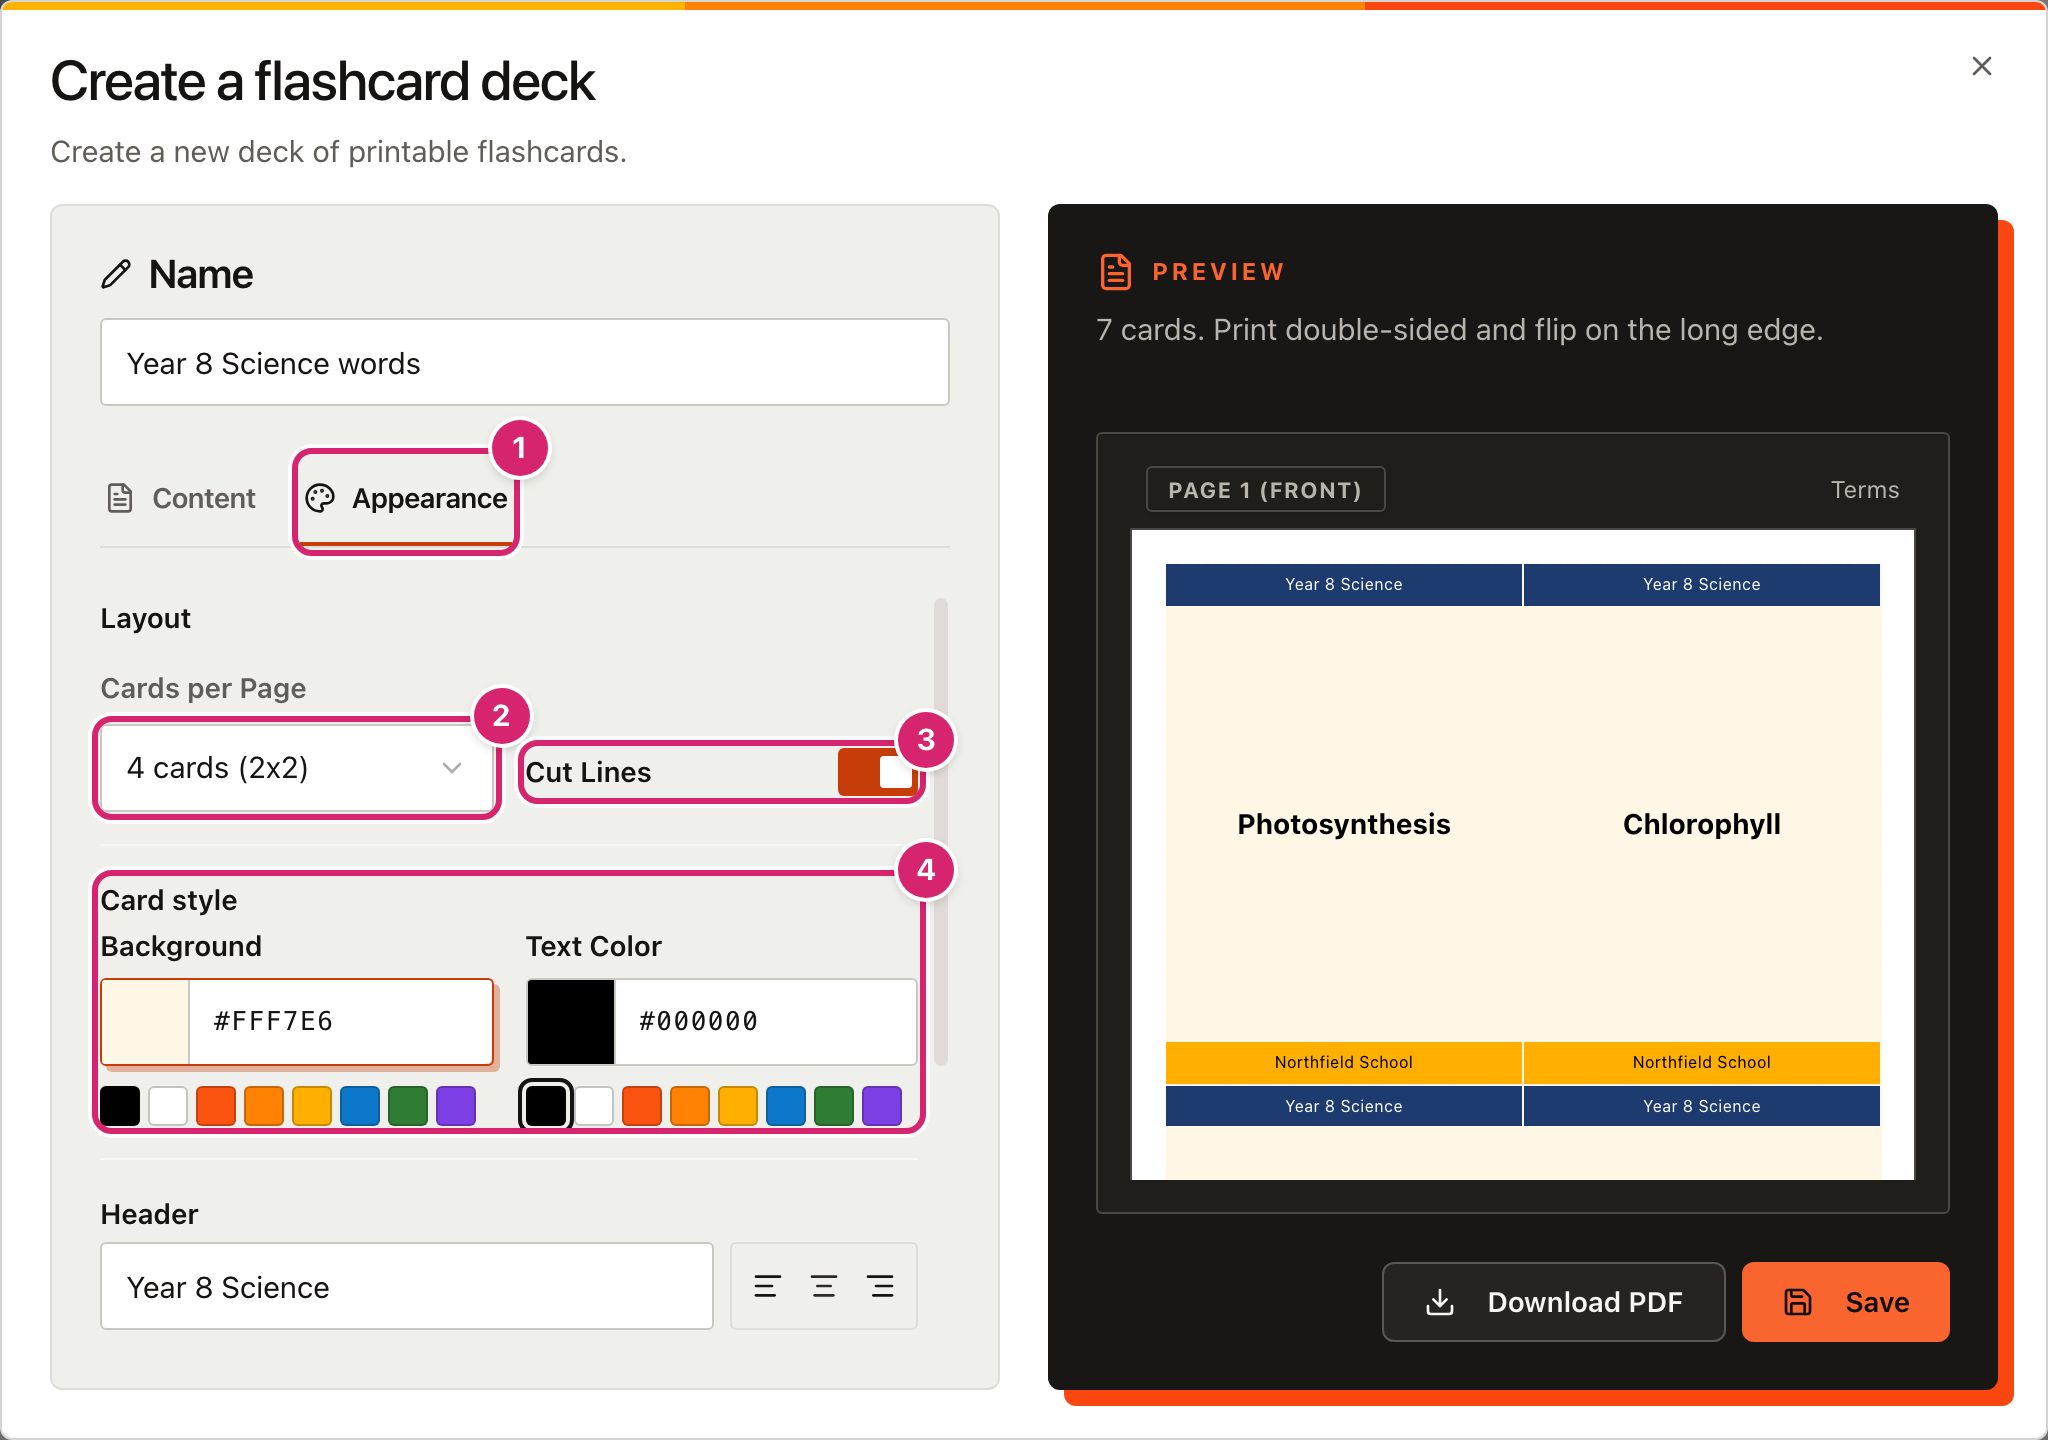
- Select Appearance 1.
- Cards per Page 2 chooses between 4 cards (2 by 2), 8 cards (2 by 4) and 12 cards (3 by 4). Fewer cards per page makes each card bigger, which leaves more room for a long definition.
- Cut Lines 3 draws dashed lines between the cards to cut along. Turn it off for a cleaner look.
- Under Card style 4, set the Background and Text Color. Type a colour code such as
#1D3B6F, or pick one of the swatches. - Scroll down for Header and Footer. Each has a line of text that appears at the top or bottom of every card, a left, centre or right alignment, and its own background and text colour. A header such as "Year 8 Science" and a footer such as "Northfield School" help you sort cards back into decks.
Print the cards
The PDF is A4. Every page of cards is followed by a back page with the definitions. The backs are mirrored so that each definition lands behind its term.
- Select Download PDF.
- Open the file and print it double-sided. Choose to flip on the long edge.
- Cut along the dashed lines.
Do a test on one sheet first. If the definitions do not line up with the terms, try the printer's other double-sided setting.
Save, edit and delete decks
Saved decks appear in a list on the main page.
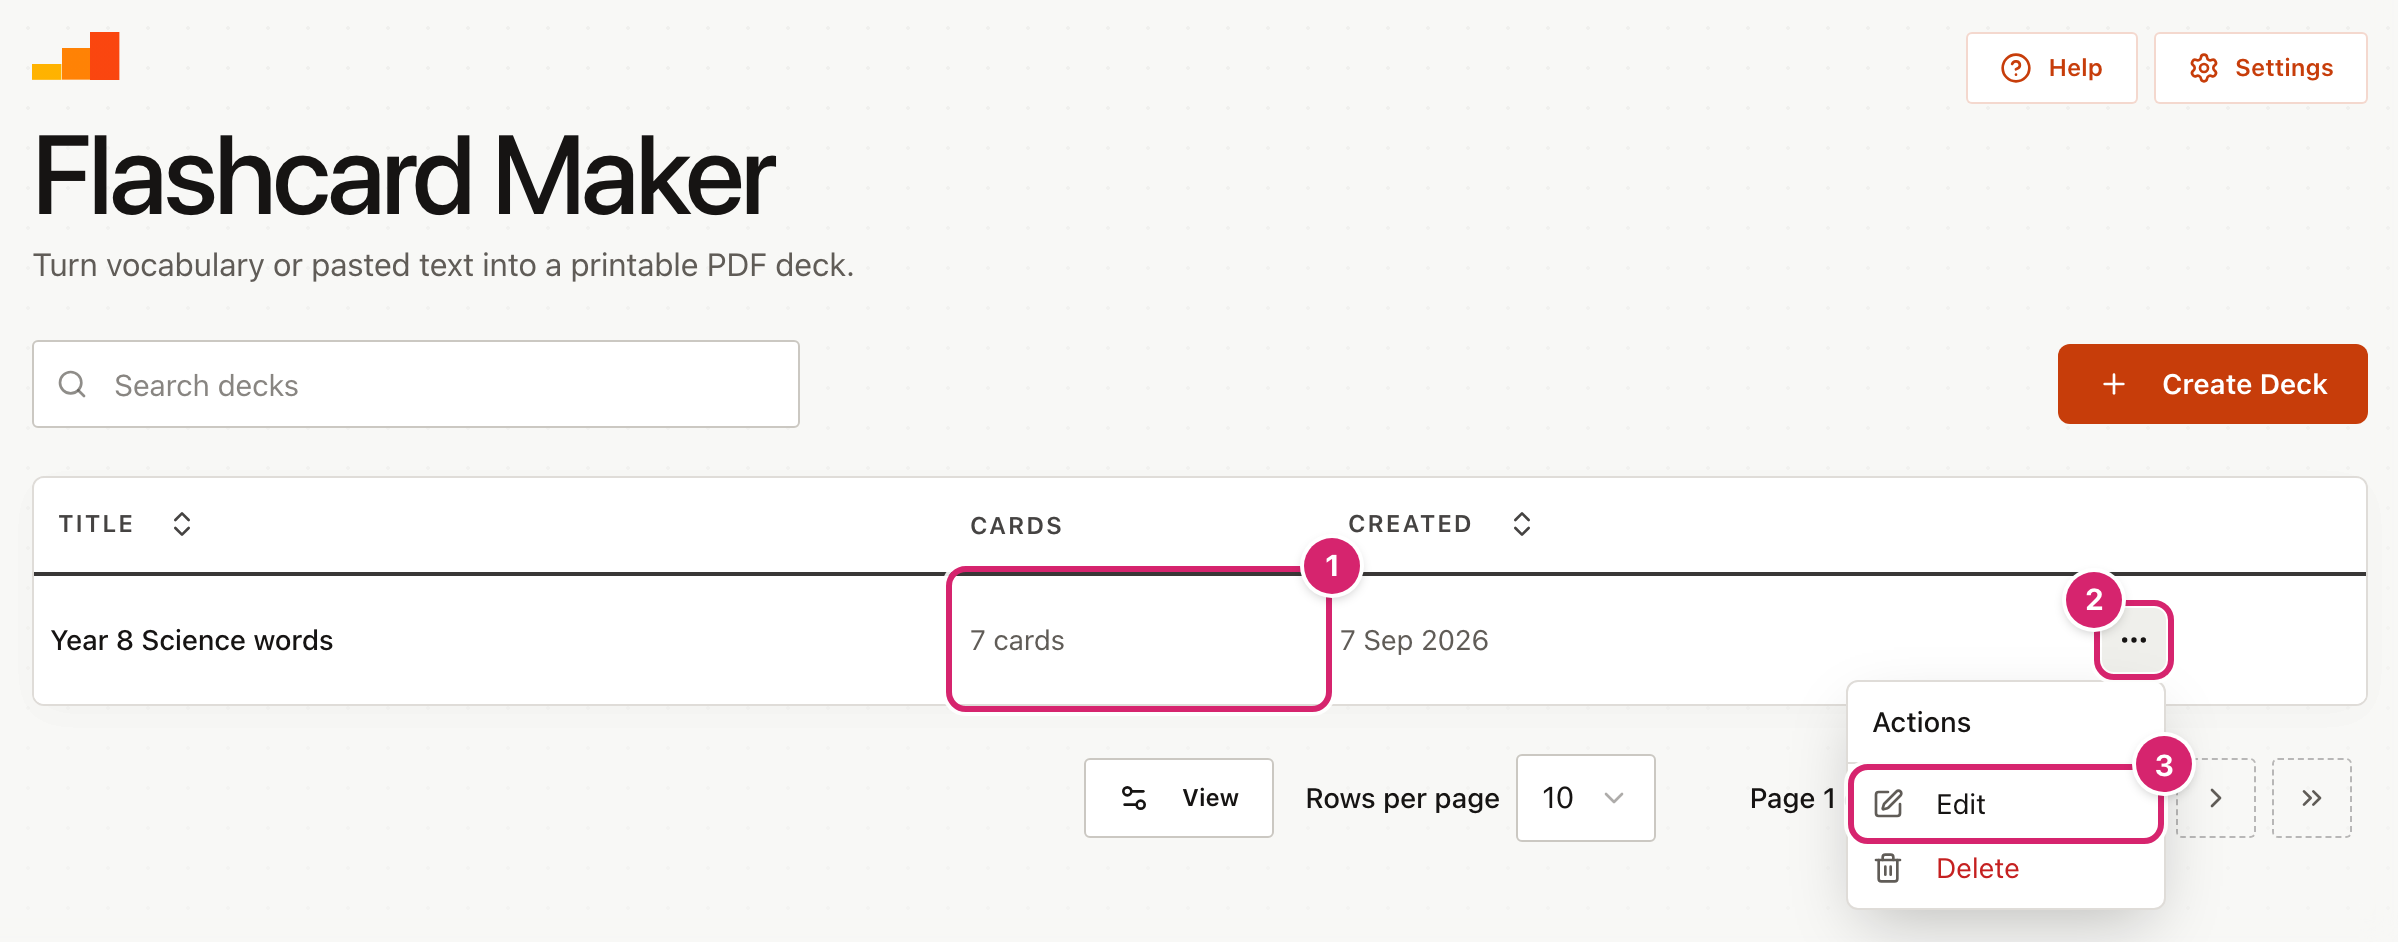
- The Cards column 1 counts the cards in each deck. Type part of a name into Search decks to find one.
- Select the ⋯ button 2, then Edit 3, to open the deck again. Change what you like and select Save. The deck is updated, not copied.
- Delete asks you to confirm. A deleted deck cannot be brought back, unless you have a backup.
Set the starting style for new decks
If you always use the same layout or colours, set them once. Every new deck then starts with them.
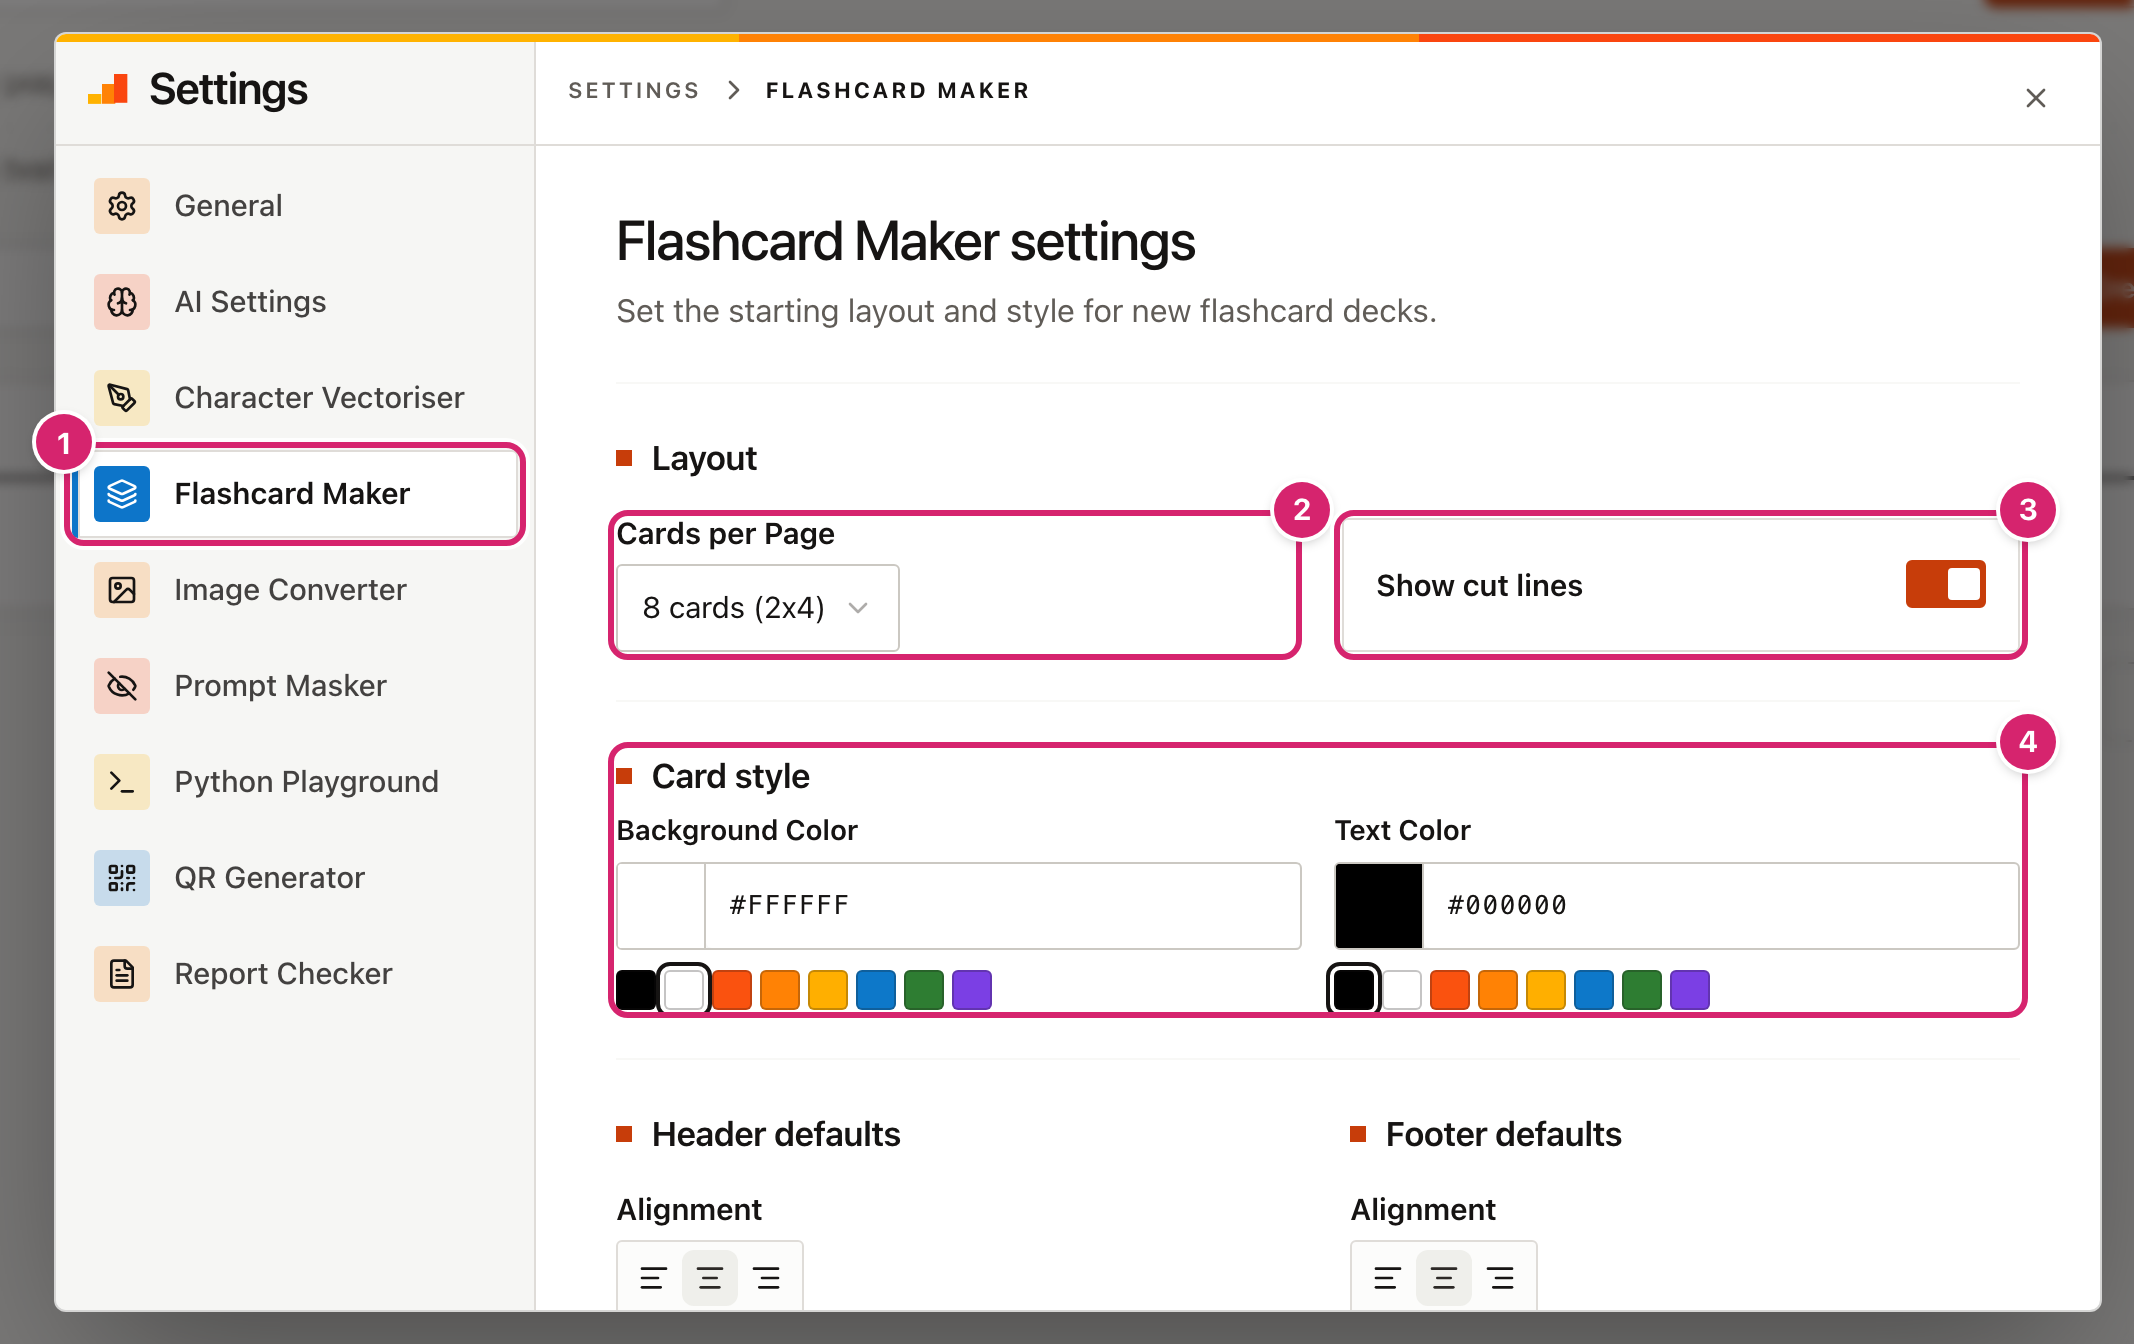
- Select Settings at the top right of the Flashcard Maker page. The window opens at Flashcard Maker 1.
- Choose Cards per Page 2, whether to Show cut lines 3 and the Card style 4 colours. Below them are the alignment and colours for headers and footers.
- Changes save as you make them.
These settings do not change decks you have already saved. The header and footer text is not part of them, so type it into each deck.
Tips
- Keep definitions short. A card is small. A sentence or two fits well. Long text can be cut off at the edge of the card, so check the preview before you print.
- Use a header for the topic. If you print several decks, "Year 8 Science" on each card saves a lot of sorting.
- Print on card. Thin paper shows the writing through to the other side.
- Test the double-sided print with one page. Printers differ.
- Keep one deck per topic. It is easier to hand one pile of cards to a group than to sort a big set.
Troubleshooting
The Save button is greyed out. The deck needs a name, and at least one card with a term or a definition. Type a name at the top and fill in a card.
Download PDF is greyed out. There are no cards with any text. Add a card and type in it.
The preview says "Add flashcard content to see preview". All the cards are empty. The preview and the PDF leave out cards with nothing typed in.
The Paste List cards have the whole line as the term.
The dash needs a space on each side. Change Cat-A small animal to Cat - A small animal. A colon needs a space on each side too.
From Vocabulary Bank says "No vocabulary tags found".
The Vocabulary Bank has no words with tags. Open Vocabulary Bank in the sidebar and add tags to your words, or import a CSV with a tags column.
I removed a tag and cards I had edited disappeared. Selecting a tag a second time removes every card that came from it, edits and all. Selecting the tag again brings back the original words, but not your edits. To keep edited cards, leave the tag selected.
The back of the cards does not match the front. Print double-sided and flip on the long edge. Flipping on the short edge puts the definitions behind the wrong terms.
The PDF takes a moment to appear. The PDF is built in your browser the first time you ask for one. The button shows Generating... while it works.
My decks have disappeared. They are stored in this browser on this device. They will not appear in a different browser, on another computer, or after the browser's data has been cleared. If you made a backup, restore it from Backup & Restore.