The Data Anonymiser changes the personal details in a spreadsheet and leaves everything else as it was. Use it when you want an AI tool to help with a class register, a set of results or a list of comments, but the file names real students. Student names, dates of birth, ID numbers and email addresses are swapped for believable fake ones, and the same student gets the same fake details in every file you do together.
Where your data goes
Your spreadsheets are opened and changed in this browser. Nothing is uploaded, and the tool makes no network requests to do its work. The anonymised file is made on this device and saved to your Downloads folder when you select it.
The tool also keeps a key: a list of every real value and the fake one that replaced it. The key is saved in this browser, on this device only. If you clear the browser's data, the key is gone unless you have a copy.
There are two ways to keep a copy. Export key saves one workspace's key as a file. Backup & Restore also includes every key. A backup file therefore contains real student details beside their fake ones, and it is not encrypted. Treat it, an exported key file and the original spreadsheet with the same care as any other student data. Do not email a backup or keep it in a shared folder.
Quick start
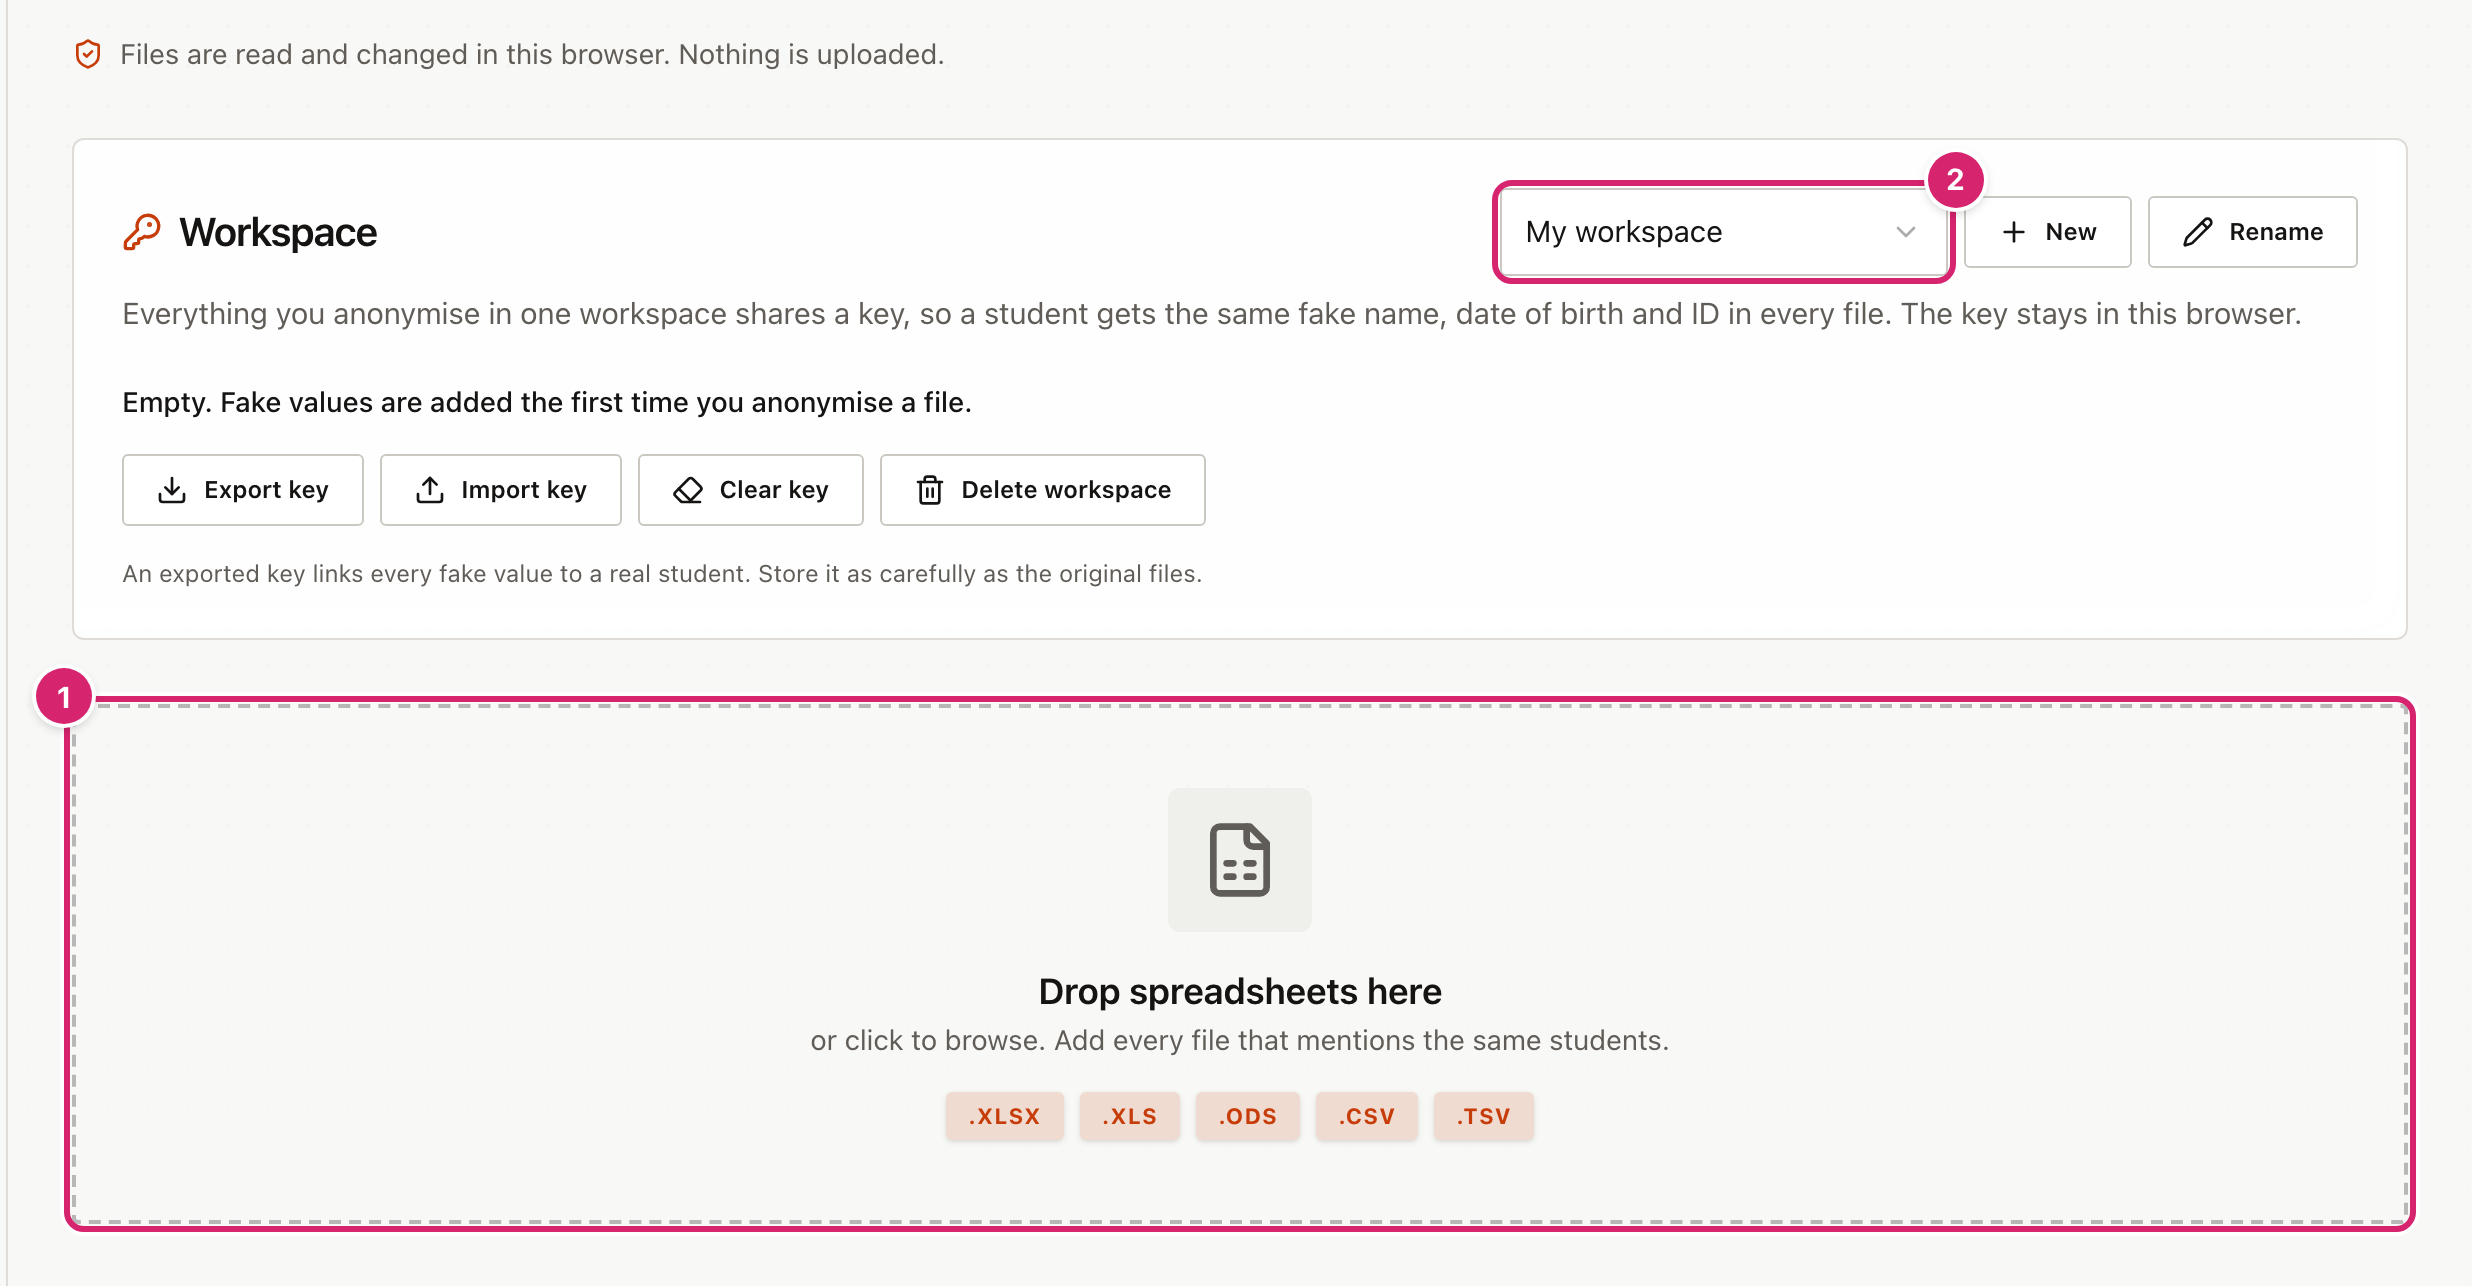
- Drag your spreadsheet onto the dashed box 1, or select the box to choose a file. The tool accepts
.xlsx,.xls,.ods,.csvand.tsvfiles. - Check what the tool has decided to do with each column. Select Anonymise.
- Read the preview. If a red warning appears, deal with it as described below.
- Select the button named after your file, with
-anonymisedadded, to save the anonymised copy. Your original file is not changed.
Everything you anonymise uses the workspace 2 shown above the box. The next sections explain what that means.
Choose what happens to each column
When a file opens, the tool lists its columns and guesses what each one holds from its heading and a few values. Columns it recognises as personal details are highlighted and set to change.
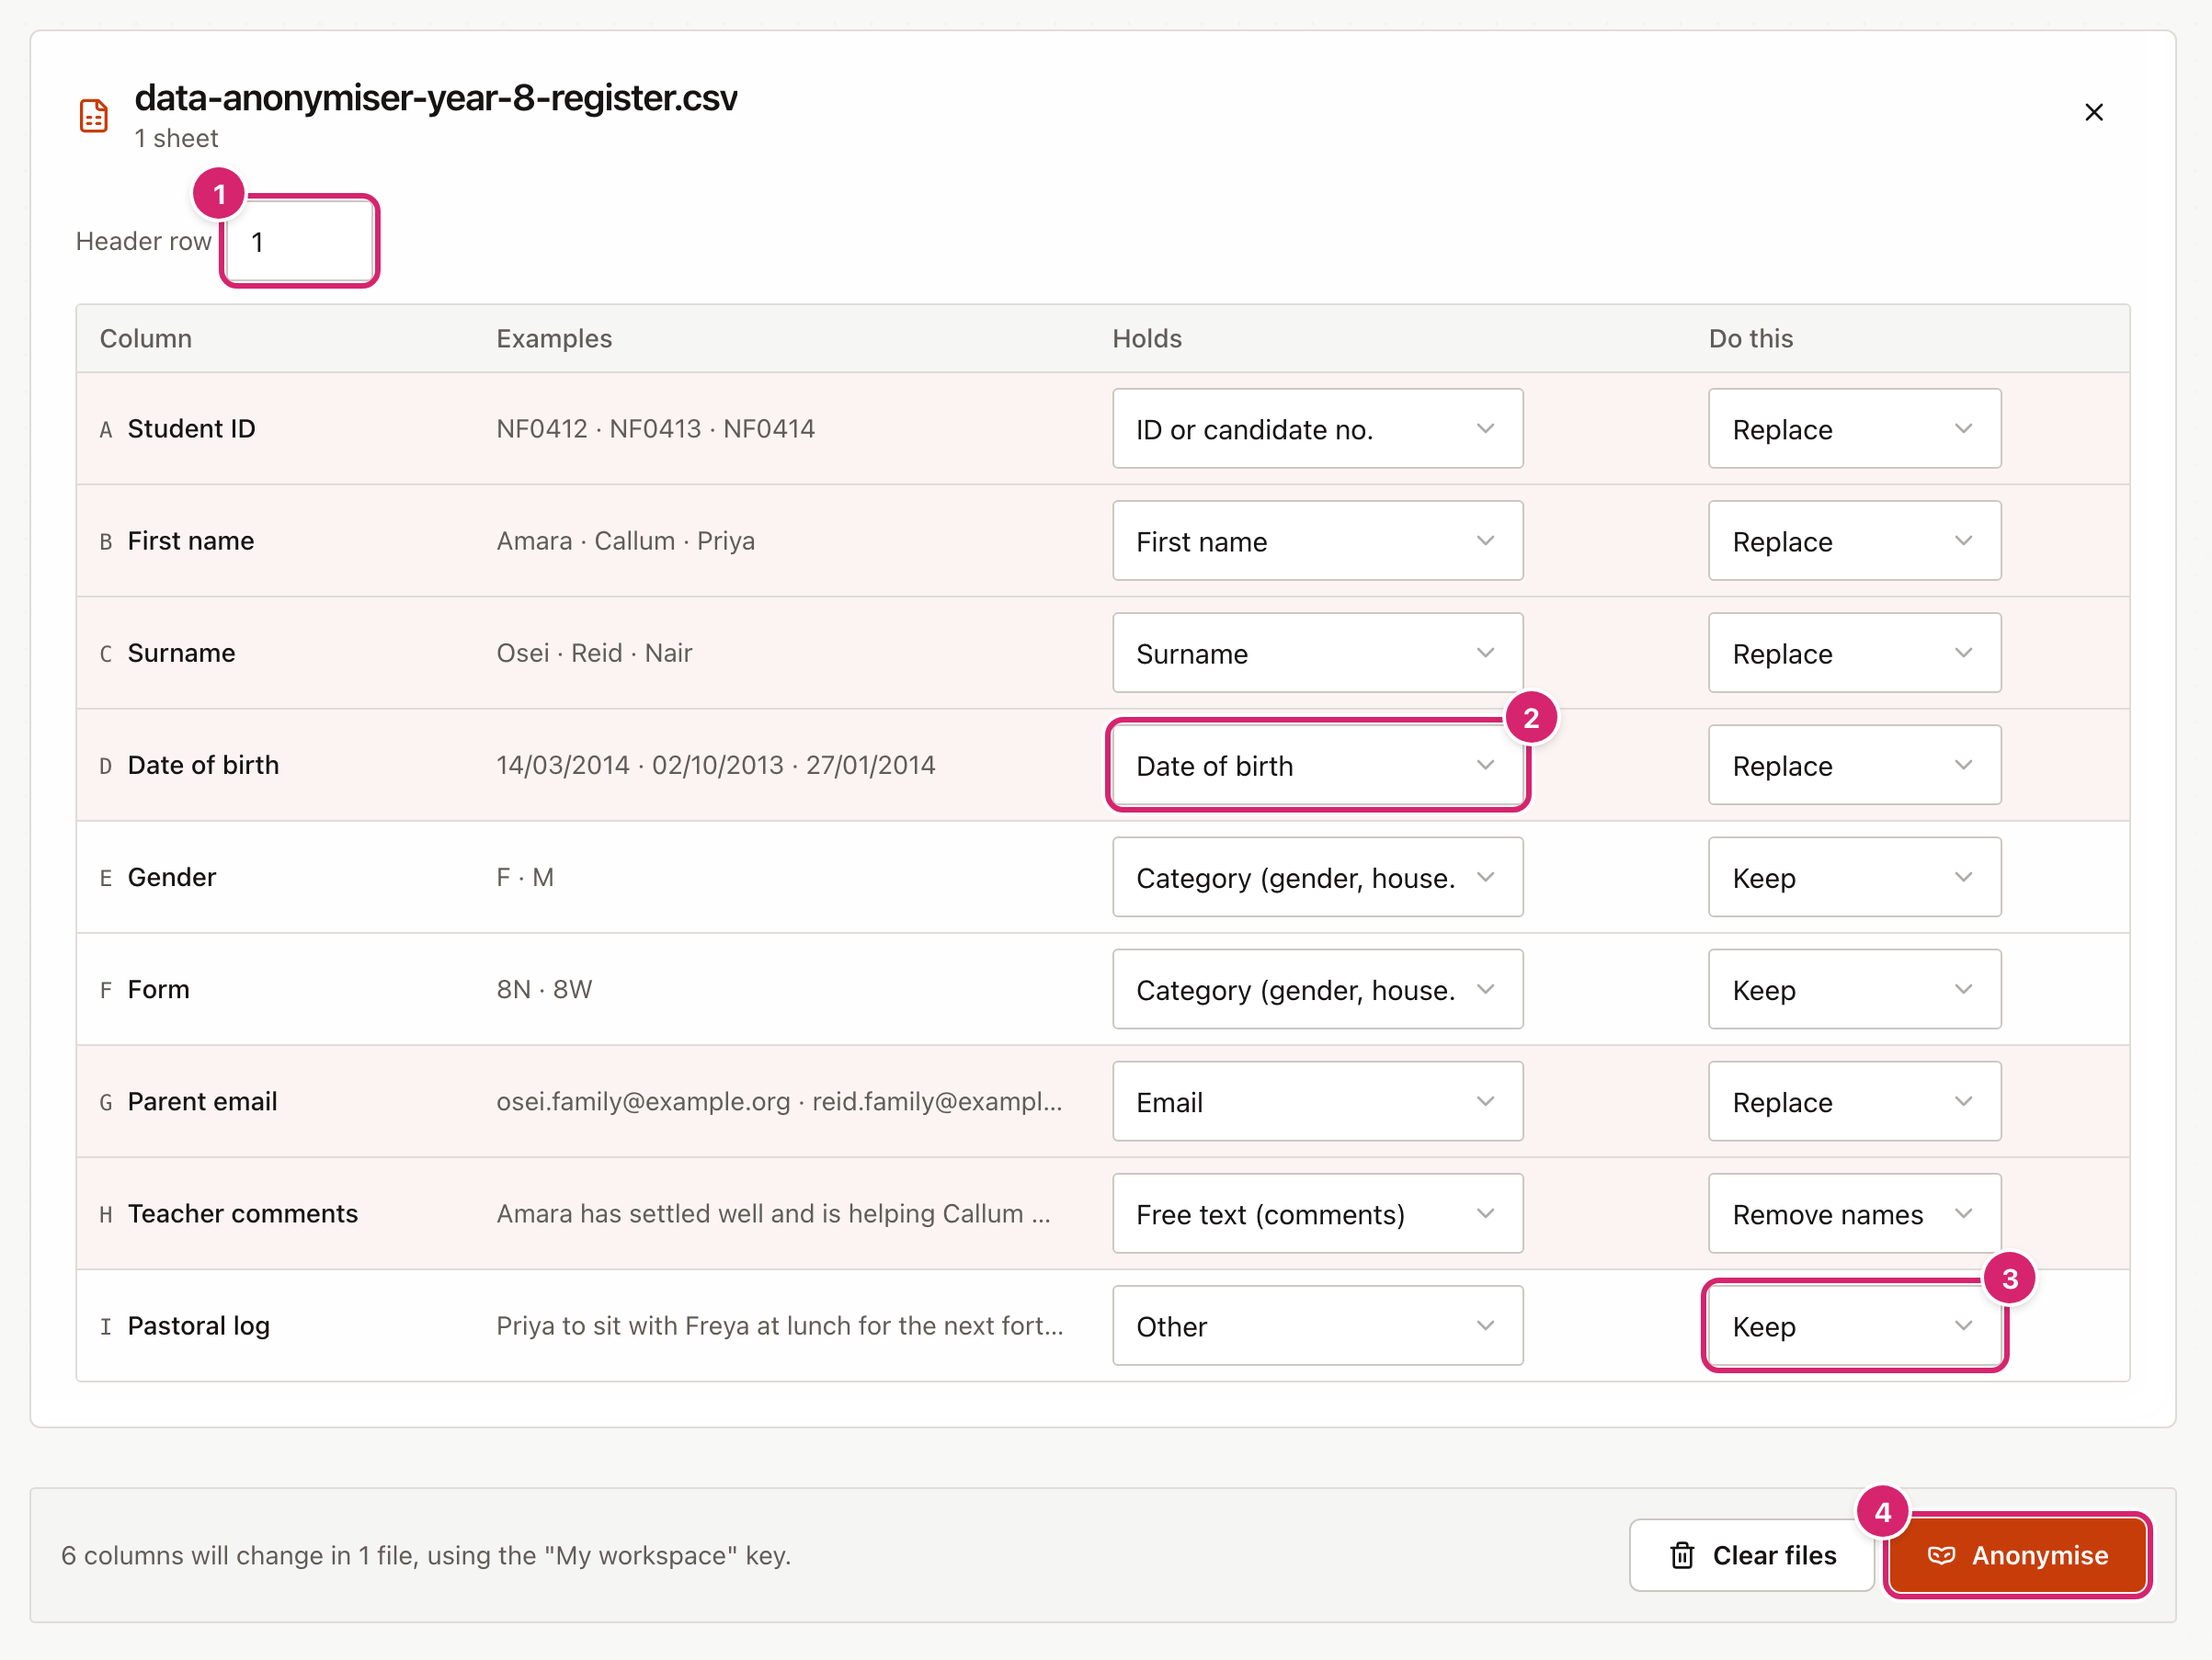
- Header row 1 is the row that holds the column headings. The tool finds it for you, which matters for files from exam boards that start with title rows. If the columns look wrong, change this number.
- Holds 2 is what the tool thinks the column contains, such as First name, Date of birth or ID or candidate no. Change it if the guess is wrong. Changing it also resets Do this to the usual choice for that kind of column.
- Do this 3 is what happens to the column:
- Replace swaps each value for a fake one of the same kind.
- Keep leaves the column alone.
- Blank empties every cell in the column.
- Remove names leaves the text but swaps any student names, email addresses and IDs it contains for their fake versions. It is the usual choice for comments.
- Anonymise 4 makes the anonymised copy. It is switched off while every column is set to Keep, because nothing would change.
Columns the tool does not recognise start on Keep. That is why Pastoral log is left alone in the picture. Read down the Do this column before you select Anonymise, and change any column that could identify a student.
What Replace does depends on the kind of column:
- Names become names from a built-in list. A fake first name matches the original's gender, taken from a Gender or Sex column if there is one, and otherwise from the name. Capitals are kept, so
SMITH, Michaelstays in that layout. - Dates of birth become a different date in the same school year (1 September to 31 August), so the student stays in the same year group. Dates keep their layout, such as
14/03/2014or14 Mar 2014, and are read as day first. - IDs and candidate numbers keep their length and pattern. Letters become other letters and digits become other digits, so
NF0412becomes something likeWQ7136. - Email addresses are rebuilt from the fake names. The part after the @ is kept, so a school email domain stays visible.
- Phone numbers keep the first two digits. Addresses become a made-up street and town, and Postcodes keep their pattern with new letters and digits.
- Category columns, such as house or form, are swapped for another value from the same column, if you choose Replace.
Check the result and download it
After you select Anonymise, a results panel appears below the file.
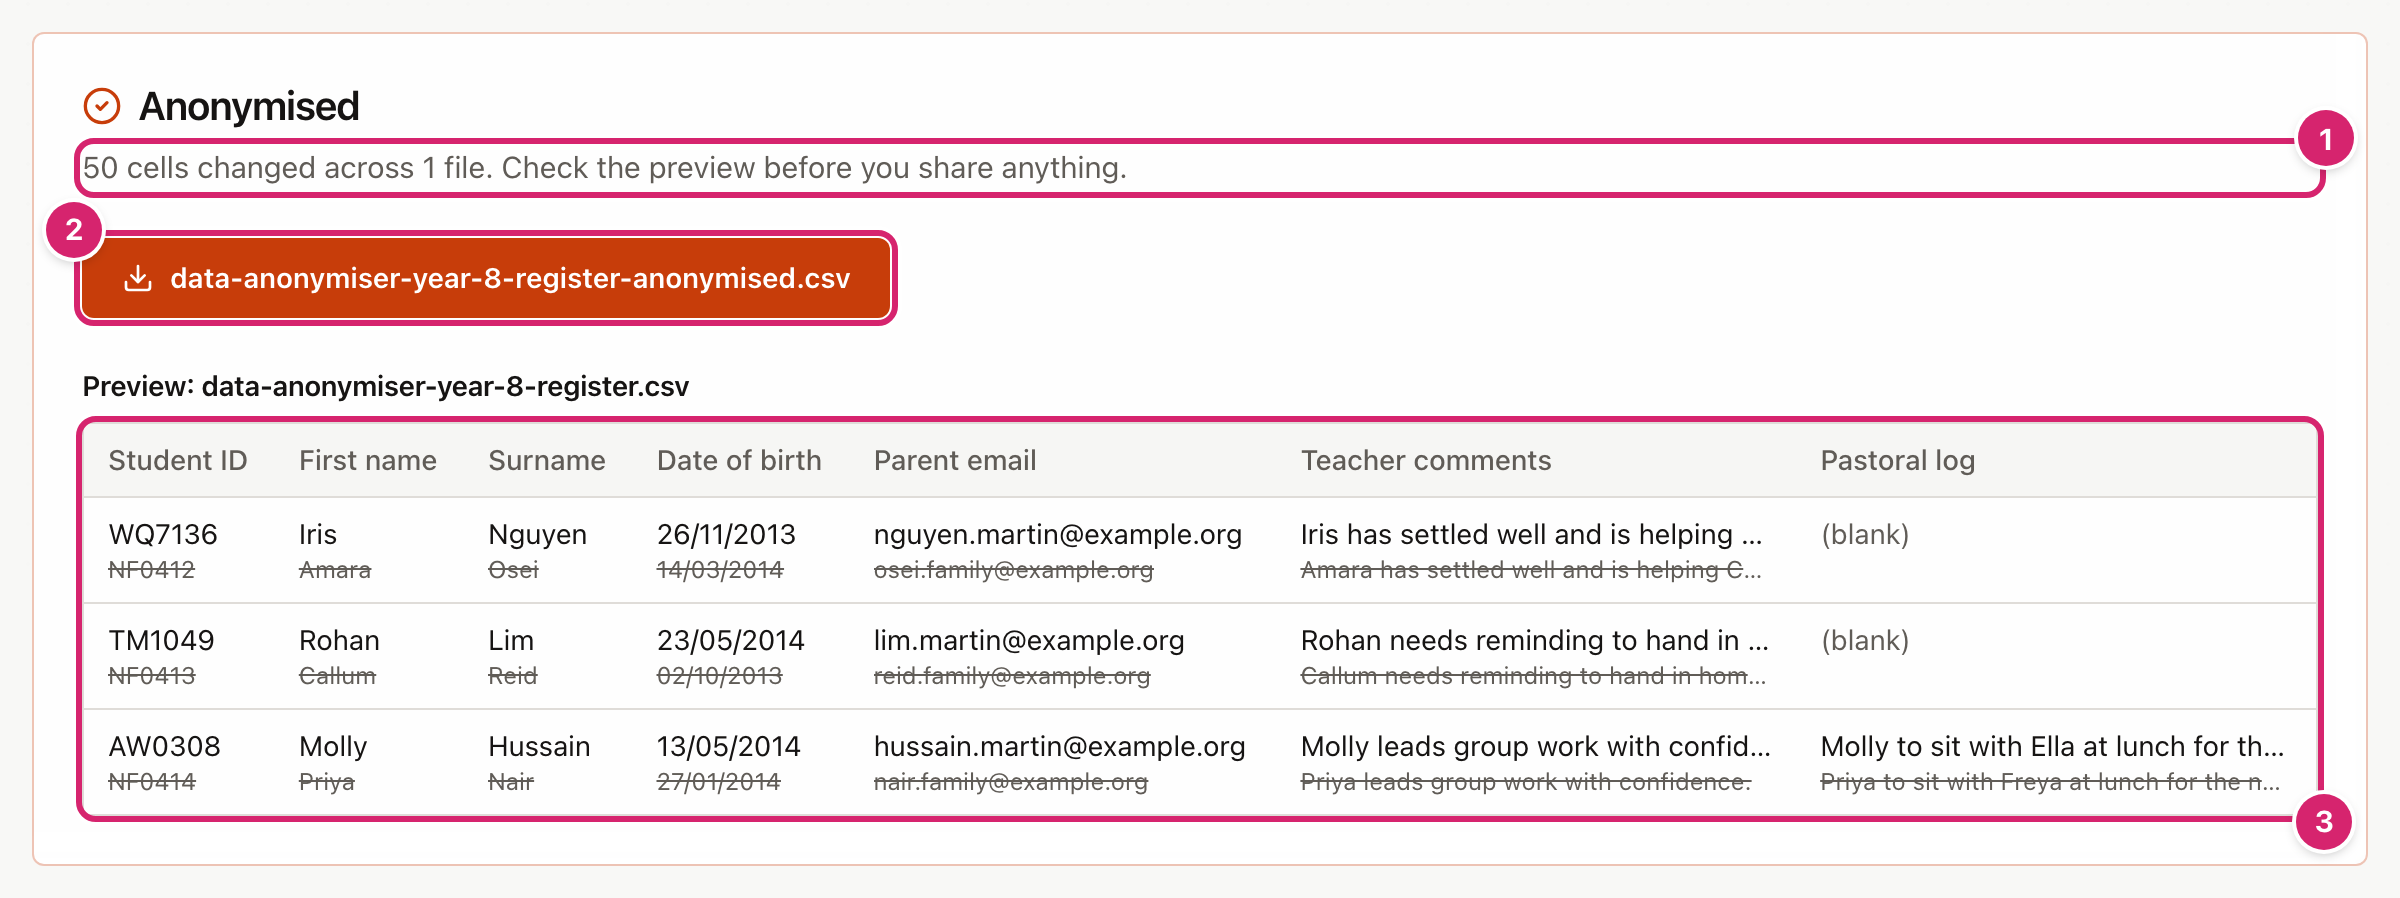
- The panel says how many cells changed 1.
- Select the button 2 named after your file to save the anonymised copy. The name is the original with
-anonymisedadded. If you added more than one file, there is a button for each and a Download all (.zip) button. - The preview 3 shows the first three rows of every changed column. The fake value is on top and the real one is underneath, struck through.
The preview shows real student details on your screen. Do not show it on a projector, and do not share a screenshot of it.
Open the downloaded file and look through it before you use it. A few things to know about the file you get:
- A
.csvor.tsvfile comes back as a.csvfile. An.xlsor.odsfile comes back as.xlsx. - Anything that is not text and numbers, such as colours and column widths, may not survive. Check a file that matters.
- The file name is not changed beyond the added
-anonymised. If the original name includes a student's name, rename the download. - Running Anonymise again on the same file gives the same fake values, because the key remembers them.
Remove names left in a column you kept
When you select Anonymise, the tool also looks through the columns you set to Keep for any real names, email addresses and IDs it has just replaced elsewhere. If it finds some, it shows a red warning before the downloads.

- Read which column and which names the warning lists.
- Select Remove names in this column 1. The tool sets that column to Remove names and runs again. Students keep the same fake names.
- Check that the warning has gone, then download.
The tool can only spot names it already knows from the name columns, so a name that is not in your spreadsheet's name columns will not be found. It also only matches names that start with a capital letter. A nickname, a misspelling or a first name that was never in a name column can stay in your text without a warning. Read any free-text column yourself before you send it anywhere.
Use the same fake names in every file
Everything you anonymise in one workspace shares a key. That means a student who is in your register and in your results gets the same fake name, date of birth and ID in both. Add all the files together before you select Anonymise, or anonymise them one after another in the same workspace.
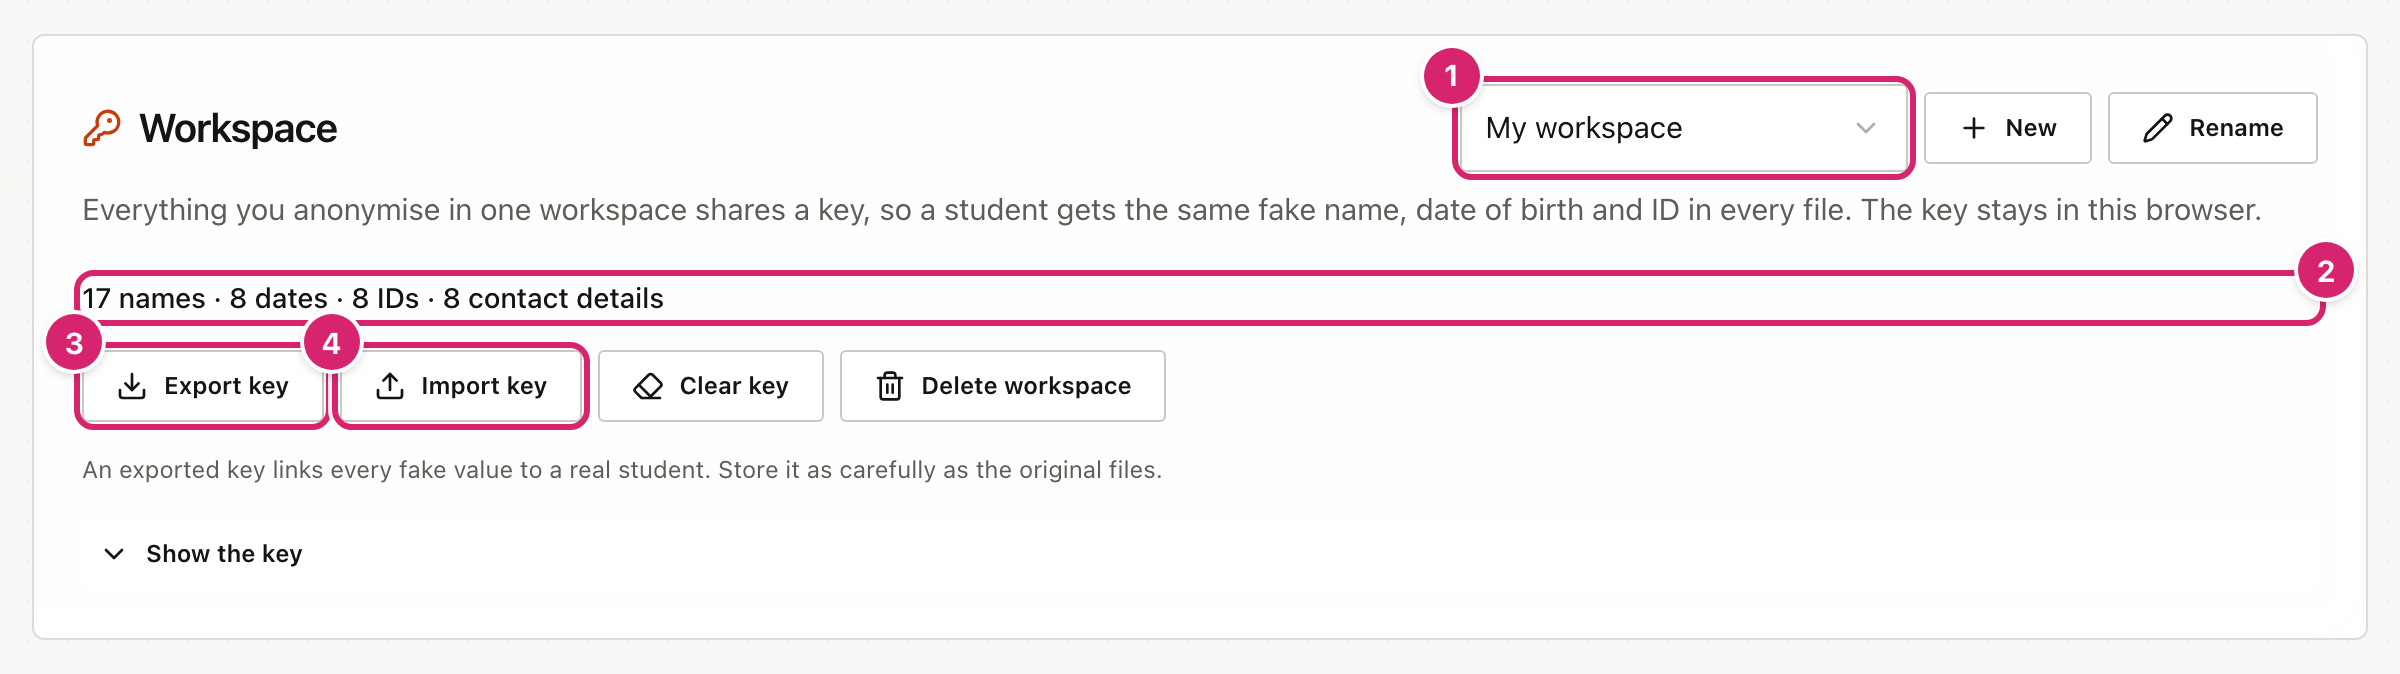
- The workspace menu 1 chooses which key to use. New makes another workspace, and Rename renames the one you are in. Use a separate workspace for each group of files about the same students, such as
Y13 2026 results. - The summary line 2 counts what the key holds so far.
- Export key 3 saves the key as a
.jsonfile. Import key 4 loads one back in. An imported key never replaces a workspace that is already there. If it clashes, it arrives as a copy named with "(imported)". - Clear key forgets the fake values, so students get different ones next time. Files you made earlier keep their old fake values.
- Delete workspace removes the workspace and its key from this browser.
Find out who a fake student is
The tool does not turn an anonymised file back into the original. It does keep the key, and the key can be read, so you can look up any fake value and see the real one beside it. This is how you can use an AI tool's answer about "Iris Nguyen" and still know who it means.
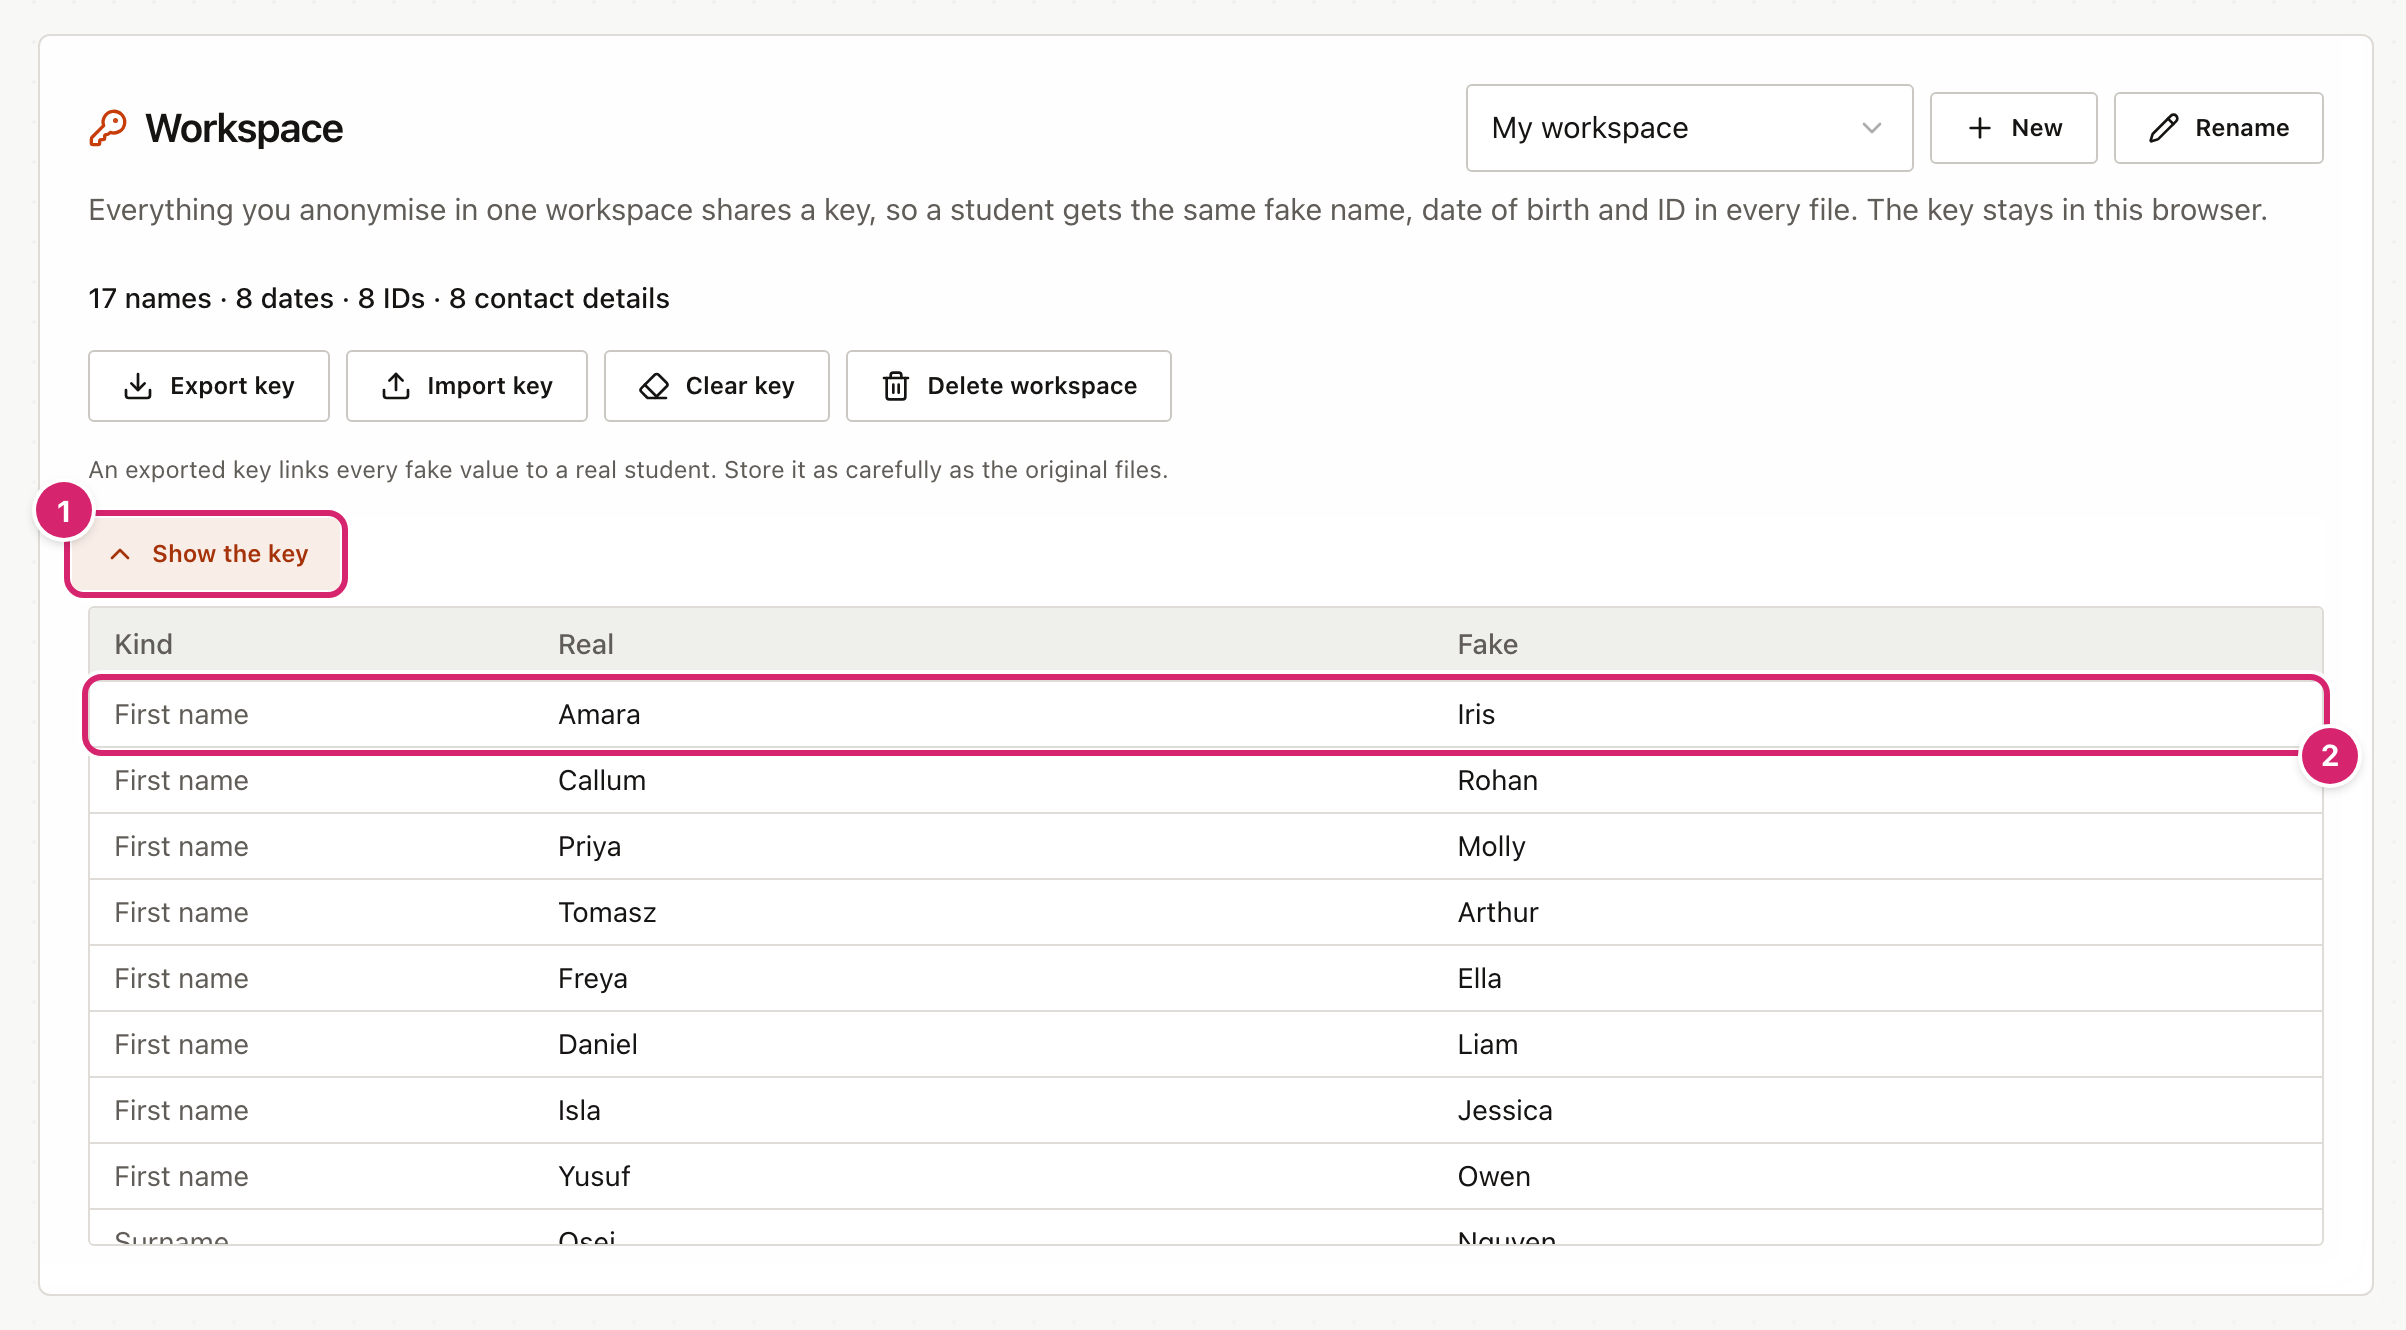
- Select Show the key 1.
- Find the fake value in the Fake column and read the real one in the Real column 2. Each row also says what kind of detail it is.
The table shows the first 200 rows. If you have more, use Export key and open the file in a text editor to see them all.
Names are swapped one word at a time, not one student at a time. Two students who share a first name get the same fake first name. Dates work the same way, so two students with the same birthday share a fake one. IDs are swapped one for one.
The key is the only way back. If you clear the browser's data, delete the workspace or select Clear key without an exported key or a backup, you can no longer look the fakes up. Restoring a backup from Backup & Restore brings the keys back. A restore that replaces everything swaps in the keys from the backup. A merge adds the keys from the backup and keeps any workspace that is already here.
Tips
- Do a small test first. Anonymise the first ten rows of a file and read the result before you do a whole year group.
- Add every file at once. The same fake names then run through all of them, and the tool can also check one file's comments for names from another.
- Keep a copy of the key if you will need it. A key in the browser is lost with the browser's data. Use Export key, or make a backup in Backup & Restore. Store either file as carefully as the original spreadsheets, and not in a shared folder.
- Keep what you need. Year group, form and marks are not personal on their own, and the tool leaves them alone by default so the AI can still use them. Check that a combination, such as a small group with unusual details, could not identify a student.
- Use it before an AI tool, not instead of thinking. Read the downloaded file before you paste or upload it anywhere.
Troubleshooting
"This file could not be read as a spreadsheet."
The file may be damaged, password protected, or not a spreadsheet at all. Open it in Excel, Numbers or Google Sheets, remove any password, and save it as .xlsx or .csv. Then try again. The file picker is set to the accepted types, but dragging a file onto the box lets you try anything.
The columns have strange headings, or the first row is a title. The tool picked the wrong Header row. Change the number above the table until the headings read correctly.
A name column is set to Keep, or a column holds the wrong thing.
The tool guesses from the heading. Use the Holds menu to say what the column is. That also resets Do this. Headings such as Subject name or Course are deliberately not treated as people.
The Anonymise button is switched off. Every column is set to Keep, so nothing would change. The bar below the table says so. Set at least one column to Replace, Blank or Remove names.
A red warning says real details are still in columns I kept. See the section "Remove names left in a column you kept". The warning is a reason to look, not an error in the file.
The key is empty after I come back. Keys live in this browser. A different browser, a private window, another device or cleared browser data starts with no key. If you made a backup, restore it from Backup & Restore. If you exported the key, select Import key.
A message says the browser is blocking storage. The tool cannot save the key, so it will be lost when you close the tab. Export the key before you leave the page, because a backup cannot hold a key the browser did not save.
"This file is not a workspace file." Import key accepts only a key exported from this tool. Do not edit the file by hand, and do not use a spreadsheet file there.
Two files give different fakes for the same student. They were anonymised in different workspaces, or the key was cleared in between. Choose one workspace, add both files, and anonymise again.
The fake names look similar to the real ones. The tool avoids names that start with the same three letters, and avoids names that appear in your files. If the pool of surnames runs out in a very large file, it joins two together with a hyphen.